Über Fahrradschläuche: Unterschied zwischen den Versionen
(→Ventile: Übersetzungsanfang) |
(→Ventilkappen: übersetzt) |
||
| Zeile 71: | Zeile 71: | ||
===Ventilkappen=== | ===Ventilkappen=== | ||
Fahrradschläcuhe werden meistens mit Kunststoffventilkappen ausgeliefert. Sie sind dazu da, das Ventil sauber zu halten - mehr nicht. Man kann eine Prestakappe auf ein Woodsventil schrauben, jedoch ist die Kappe fpr Woodsventile zu kurz für ein Prestaventil. Schraderventilkappen aus dem Autombilzubehör haben eine zusätzliche Dichtung, die das Entweichen von Luft verhinderen, selbst wenn das Vetil undicht ist. Die besten Ventilkappen für Schraderventile besitzen auch einen Schlüssel um den Ventilkern herauszuschrauben. | |||
[[Bild:Schrader valve cap.JPG|center|thumb|Bessere Schraderventilkappe mit Dichtung und Schlüssel (im Bild größer als im echten Leben)]] | |||
===Ventilschaftlängen, Ventilverlängerungen=== | ===Ventilschaftlängen, Ventilverlängerungen=== | ||
Version vom 22. Februar 2016, 09:53 Uhr
Dieser Artikel soll allgemeine Informationen über Schläuche geben. Auf diesen Seiten existieren noch weitere Artikel, die sich mit platten Reifen und Reifengrößen beschäftigen. Natürlich gibt es am Ende dieses Artikel eine Linkliste mit weiterführenden Informationen.
Das Innere des Reifens
Viele Leute glauben, dass Reifen aus Gummi gemacht werden, weil es offensichtlich nach Außen so aussieht. Das ist aber sehr vereinfacht. Ein Reifen ist tatsächlich aus drei Teilen zusammengesetzt:
- Der Wulst ist eine der zwei Kanten aus widerstandsfähigen Stahldrähten. (inzwischen häufig Kevlar ™-Stränge.
- Die Karkasse formt den Reifenkörper und ist zwischen den beiden Wulsten aus einem Gewebe geformt. Die meisten modernen Reifen haben ein Nylongewebe.
- Das Gummi, das alle anderen teile überdeckt. Die Gummifläche, die die Straße berührt ist dicker als der Rest und wird Lauffläche genannt.
Ein Fahrradreifen selbst ist nicht luftdicht. Daher kommt ein Schlauch zum Einsatz, der grundsätzlich wie ein doughnut-förmiger Ballon aussieht. Er hat ein Ventil, über das Luft eingefüllt und entlassen werden kann. Die Hauptanforderung an den Schlauch ist, dass er dicht ist. Er ist aus Gummi und hat keine feste Struktur. Wenn er außerhalb des Reifens aufgepumpt wird kann er auf das zwei- bis dreifache seiner Normalgröße anwachsen, bevor er platzt. Ohne umliegende Reifenstruktur kann er keinem wesentlichen Druck von Außen widerstehen.
Schlauchlose Reifen kommen immer mehr in Mode. Sie setzen voraus, dass die Felge und der Reifen luftdicht sind. Das erzeugt mögliche Komplikationen - insbesondere auf Felgen mit Speichen. Dies soll aber nicht Teil dieses Artikels sein.
Dimensionen
Mehrere Dimensionen eines Schlauchs sind wichtig. Sie werden im Folgenden behandelt.
Durchmesser
Fahrradreifen und Schläuche wrden in einer großen Varianz an Durchmessern verkauft. Da Schläuche dehnbar sind, können sie ungenau passen. So werden zum Beispiel die gleichen Schläuche für die Reifengrößen ETRTO 630 mm (27 Zoll) und 622 mm (Französisch 700 C) verwendet.
Allerdings gibt es Grenzen! Ein zu großer Schlauch wird sich im Reifeneineren falten und so ein sehr unregelmäßiges Fahrgefühl verursachen. Dazu besteht die Gafehr von Schäden. Ein zu kleiner Schlauch muss wie ein Gummbiand über die Felge gezogen werden und kann so die Reifen-/schlauchmontage sehr schwierig machen.
Manchmal sind die Größen von Schläuchen nicht nah beieinander, obwpohl sie die gleiche Bezeichnung tragen. Es gibt beispielsweise zwei Reifengrößen mit der Bezeichnung 24 x 1 1/8, aber die Felgendurchmesser sind 20 mm unterschiedlich - 520mm und 540mm. Der größere Schlauch wird sich im inneren der kleineren Reifens falten. Jedoch lässt sich der kleinere Schlauch im zu großen Reifen mit etwas Mühe irgendwie verbauen. Die Durchmesser von Schläuchen kann man ganz schnell vergleichen, in dem man sie nebeneinander ausbreitet - wie es im Bild unten sichtbar wird.

Breite
Schläuche sollen in verschiedene Reifenbreiten passen. Weil Schläuche sehr dehnbar sind, gilt auch hier, dass sie für verschiedene Reifenbreiten ausgezeichnet sind.
Man kann vor der Monatge des Reifens auf der Felge den Sitz prüfen. Wenn der Schlauch gerade so viel aufgepumpt wird, dass er seine Form hält, kann man ihn in den Reifen stopfen. Die Lücke zwischen den Wulsten sollte nun in etwa so breit sein, wie der Felgenflanschabstand innen.
Sobald der Reifen montiert ist aber der Schlauch zu breit ist, schaut er unter dem Reifen hervor und wird verhindern, dass der Reifen richtig in der Felge sitzt oder im Inneren zusammenknittern. Wenn der Schlauch zu schmal ist, muss der Schlauch sich sehr weit dehen, um das Innere des Reifens auszufüllen. Dabei kann er reißen oder aufplatzen.
Im Notfall kann man einen zu langen Schlauch benutzen und mit dem ungleichmäßigen Rundlauf durch den gefalteten Reifen bis zu nächsten Fahrradladen fahren. Man sollte in jeden Fall vermeiden, einen zu schmalen Schlauch - vor allem am Vorderrad - zu benutzen. Ein plötzlicher Druckverluist am Vorderrad kann zu einem kompletten Kontrollverlust führen.
Wandstärke
Die meisten Schläuche haben eine Wandstärke von rund einem Milimeter. Das ist genug, damit Luft nicht durch das Gummi diffundiert und raue Stellen im Reifen und an der Felge keine Löcher verursachen.
Leichtbauschläuche sind dünner (eher wie Einmalhandschuhe aus dem Medizinbereich) und müssen vorsichtiger behandelt werden. Manche müssen vor jeden Ausritt aufgepumpt werden.
In manchen Regionen (Südwesten der USA oder Südeuropa) sind Erdsternchen so verbreitet, dass stichfeste Schläuche eine wünschenswerte Option sind. Sie sind unter der Lauffläche verstärkt, um platte Reifen zu vermeiden. Diese Schläuche sind nicht nur schwerer sondern erhöhen auch den Rollwiderstand. Sie machen die Laufräder schwer und träge. Bei falscher Monatge erhöhen sie das Risiko eines Plattfußes. Sie sind eigentlich nur in Gegenden sinnvoll, in denen es vor Erdsternchen wimmelt. Ein Dichtmittel im Schlauch, das kleinere Löcher selbständig von innen heraus verschließen kann und ein Pannenband wie das überwiegend in den USA bekannte Mr. Tuffy sind andere wertvolle Alternativen.
Ventilgrößen
Werden im folgenden Abschnitt behandelt.
Ventile
Es gibt drei Typen von Ventilen, die bei Fahrrädern üblich sind:
- Die verschiedenen Ventilarten
Schraderventil mit Ventilkappe

Schraderventil ohne Ventilkappe
Prestaventil mit Ventilkappe
Prestaventil, geschlossen
Prestaventil, geöffnet
Prestaventil mit Adapter
Dunlopventil


- Schraderventile findet man auch bei Automobilreifen. Sie sind bei weniger teuren Fahrrädern verbreitet. Man findet sie für gewöhnlich an Fahrrädern mit breiten Felgen und Reifen. Schraderventile heißen auch amerkianische oder Autoventile.
Schraderventile haben einen Federmechanismus, der einen kleinen Nippel in der Mitter des Ventil hochdrücket. Dieser muss von einem Vorsprung im Pumpenkopf heruntergedrückt werden, um Luft in den pumpen zu können. Mit dem Fingernagel oder einem kleinen Schraubendreher kann man die Luft ablassen. Vor der Erfindung der Zéfal HP Pumpe mit ihrem Klemmmechanismus im Pumpenkopf gab es keine portable Pumpe, die es zustande brachte, hohen Druck in Reifen mit Schraderventilen zu pumpen. Ältere Pumpen hatten einen aufschraubbaren Schlauch und Luft wich zwischen Ventilschaft und dem Schlauch beim Abschrauben heraus, weil der Nippel in der Mitte weiter heruntergedrückt wurde.

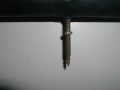
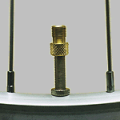
Beim kürzeren Kern ist die Feder innenliegend
Am oberen Ende erkennt man die Aufnahmen für Schlüssel.
- Presta-, Französische- oder Sclaverand- (Name des Erfinders) Ventile sind schmaler im Durchmesser. SIe sind etwas leichter and benötigen ein kleineres Loch in der Felge, was für schmaler Felgen wünschenswert ist. Prestaventile findet man vor allem an leistungsorentierten Rädern und an allen Schlauchreifen. Presta- und Schraderventile benötigen unterschiedliche Pumpenköpfe. Manche Pumpen haben Wechselköpfe.
Prestaventile haben keinen Federmechanismus, sondern eine festsitzende Rändelschraube, die den Reifen dicht hält. Vor dem Aufpumpen eines Prestaventils muss die Rändelschraube losgedreht werden. Zudem kann es ratsam sein, den mittig sitzenden Stift kurz anzutippen, um die Dichtung zu lösen, denn diese sitzt manchmal fest. Nach dem Aufpumpen des Reifens muss man die Ventilrändelschraube wieder fest drehen, um das Entweichen der Luft zu verhindern. Es gibt Adapter, die erlauben, einen Schlauch mit Prestaventil mit einer Pumpe aufzupumpen, die für Schaderventile ausgelegt ist. Bessere Varianten haben eine kleine Ringdichtung, die das Entwichen der Luft entlang des Gewindes verhindert. Der einfachste Weg, einen Verlust zu verhindern, ist es den Adapter auf dem Ventil aufgescharubt zu lassen und die Schraderpumpe bei sich zu tragen. Damit kann man Jedermanns Reifen aufpumpen.
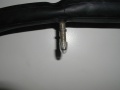
Manche Prestaventile können herausgeschraubt werden. Man erkennt sie am den Schlüsselaufnahmen (wie im Bild zu sehen). Diese Schlüssel sind sehr selten können aber durch den Einsatz eines Engländers ersetzt werden. um den Kerne zu lösen oder befestigen.
Beim Aufpumpen eines Prestaventils sollte man acht geben, dass man den Stift in der Mitte nicht verbiegt oder abbricht. Wenn er verbogen ist, lässt sich unter Umständen das Ventil nicht mehr verschließen. Wenn der Stift abgebrochen ist kann ein Teil des Ventilmechnismus nach innen ins Ventil abrutschen. Dann muss man den Schlauch ersetzen oder nach der Reparaturanlietung von Jobst Brandt (englisch) reparieren. - Woods- (auch Dunlop)ventile sind am unteren Ende dem Schraderventil ähnlich. Sie verjüngen sich in etwa auf den Durchmesser von Prestaventilen und sind vor allem in den Niederlanden und im asiatischen Raum beliebt. Sie lassen sich mit einer Pumpe für Prestaventile oder einer Schraderpumpe mit Adapter aufpumpen. Zumeist sind Woodsventile nicht für hohen Druck ausgelegt. Auch kann man den Druck nur während des Pumpvorgangs kontrollieren. Um Luft entwichen zu lassen, muss man den Ventilkern losschrauben, in dem man die Rändelschraube löst. Wenn man diese Schraube nur teilweise löst, reduziert man die Gafhr, Teile zu verlieren.
Woodsventile haben entweder eine interne Dichtung oder einen kleinen Latexgummischlauch. Die meisten Woodsventilkerne können zwischen allen Woodsventilen ausgetauscht werden. Auf dem Bild unten sieht man rechts ein Ventil, bei dem das allerdings nicht der Fall ist.


Ventilkappen
Fahrradschläcuhe werden meistens mit Kunststoffventilkappen ausgeliefert. Sie sind dazu da, das Ventil sauber zu halten - mehr nicht. Man kann eine Prestakappe auf ein Woodsventil schrauben, jedoch ist die Kappe fpr Woodsventile zu kurz für ein Prestaventil. Schraderventilkappen aus dem Autombilzubehör haben eine zusätzliche Dichtung, die das Entweichen von Luft verhinderen, selbst wenn das Vetil undicht ist. Die besten Ventilkappen für Schraderventile besitzen auch einen Schlüssel um den Ventilkern herauszuschrauben.

Ventilschaftlängen, Ventilverlängerungen
Presta valve stems of different lengths are available, for rims of different depths. It is best for a valve stem to be only just long enough, to reduce the risk of its being bent or broken. There are also valve-stem extenders, of three kinds:
- A hollow tube which screws onto the valve-cap thread like a Schrader adapter. The knurled nut of the valve must be tightended in its open position so it can't vibrate closed during riding. Only air pressure then seals the valve, risking leakage, more so with low-pressure tires. A spoke, straightened paper clip or the like must be inserted into the extender to depress the nut.
- A tube which also attaches to the valve-cap threads, but with a rod which engages the knurled nut and extends out past the end of the tube, so the nut can be turned to open and close the valve.
- An extender with its own valve core at the exposed end. The extender is installed in place of the original valve core, and so can be used only on an inner tube with a removable valve core.
Unless an extender has its own valve core, a pressure reading is possible only with a pump which has a built-in pressure gauge. Like a Presta to Schrader adapter, an extender which screws onto the valve-cap threads must have a rubber o-ring seal, or it must be sealed with silicone caulking compound or the like, else it will leak during pumping.
Durchmesser des Felgenlochs
The Presta valve hole is 7mm in diameter, and the Schrader valve hole, 8.5 to 9mm. Presta inner tubes may be used in rims that are drilled for Schrader or Woods valves, though it is advisable to install a rubber grommet in the valve hole. A Schrader or Woods valve won't fit through the valve hole of a rim drilled for Presta. Presta-drilled rims (except the very narrowest) may be reamed, or drilled to accommodate Schrader valves, using an 8.5mm (0.326 inch), 21/64" (0.328 inch) or Q (letter size designation, 0.332 inch) drill bit. Some rubber-coated Schrader valves may require a slightly larger hole.
Ventilfixierung
Most inner tubes have the metal of the valve stem bonded to the rubber, with a thicker rubber patch for reinforcement. Some valves, mostly older Presta ones, clamp to the inner tube with a mushroomed bottom end of the valve stem, nut and washer. The washer may be too wide to fit in the bottom of the rim. In this case, you need to build up the area inside the rim either side of the valve hole so the inner tube doesn't sag and tear. Silicone rubber caulking compound works for this. Ditch the jam nut
Some inner tubes have a valve stem threaded all the way down to the rim, and a knurled jam nut to clamp the valve stem to the rim. I (John) know that Sheldon's photos show this nut in place on the Presta and Woods valves, but it has only one use -- to make installation of the pump head slightly easier when the tire is uninflated. The valve stem is more likely to bend, break or pull loose from the inner tube if clamped down. It is easy enough to pinch the tire between finger and thumb to keep the valve stem extended when installing the pump head.
Qualität und Zuverlässigkeit
[This section by John Allen]
A blowout or sudden deflation can result in a serious crash. Inner tubes are not expensive, and it makes sense to use only high-quality ones. I have some inner tubes which are 30 or 40 years old, and still just fine, pliable and strong. I know their age, because they are the original ones from bicycles which someone bought and used briefly, then set aside. On the other hand, in recent years I've had, or seen, inner-tubes which never should have gotten out of the factory:
- A pair of IRC inner tubes with Presta valves, made in Indonesia, were the rubber around the valve stem came apart within days after installation;
- An inner tube (I'm not sure of the brand) where some little scrap of rubber got inside the mold during manufacture and thinned the wall of the inner tube at one spot, so that it eventually developed a leak there. I wasted a lot of time examining the tire before checking the inner tube and realizing that it had failed without any outside help;
- An inner tube where rubber peeled away from the Schrader valve stem, deflating the tire and leaving me stranded. The inner tube had been installed only weeks earlier, by a conscientious bicycle manufacturer. I have a photo of this one.
inner tube stem failure
- Reports from the US Consumer Product Safety Commission of tubes which split (though in fairness, this can happen due to incorrect installation or use of a skinny tube in a fat tire);
- A cyclist's post on Facebook about an inner tube which developed hundreds of tiny cracks and deflated. My next-door neighbor complained that the no-name inner tube he had recently bought for his wheelbarrow had the same problem. The wheelbarrow inner tube had an odd chemical smell, and bore evidence that the manufacturer knew of the problem: sealant was leaking out of the holes. I have a photo of the wheelbarrow inner tube.
Defective wheelbarrow inner tube
All of these reports, though, are of one or a few failures. A large sample of product sales and failure numbers is needed to draw conclusions about reliability -- yet there is no systematic recording of inner-tube failures, except when they are reported back to manufacturers. Manufacturers usually don't release the data unless forced to by a court of law.
Here are some things you can do though to protect yourself:
- Inflate the inner tube so it is somewhat thicker than it would be inside the tire. Give it a thorough visual inspection, all the way around.
- Hang the inflated tube next to a wall, mark the lowest spot, leave it for a half hour and see whether it has sagged, to check for a slow leak. Or dip it in water all the way around to check for bubbles -- but then you'll have to dry it off before installing it.
- Wiggle the valve backward, forward and sideways, pull and push on it to check that it is securely attached.
- Smell the inner tube. Good rubber has a distinctive odor, not at all unpleasant. Get to know that odor. If the tube smells different, reject it.
- Buy inner tubes of reputable brands. Jan Heine, of Bicycle Quarterly magazine and Compass Cycles, recommends Continental brand, German inner tubes. I'd like to say that established Asian brands like IRC and Kenda were reliable, but they have moved their manufacturing to mainland China, Indonesia etc. where quality control evidently is lacking. It pains me to paint with a broad brush here, because I know that my advice unfairly affects manufacturers which are producing reliable inner tubes. Just to give one example, a Sunlite inner tube which I inspected recently when replacing a worn-out tire was just fine, after several years of use. Sunlite is not a high-end brand. But I know only about that one inner tube, not about the overall performance of the brand.
The lesson for a cyclist or bike shop owner is that you need to look after your own safety, or the quality of the product you sell. Quality control in manufacture is a task for the industry and government. The task lamentably is not being addressed as it should be, even though with bicycle inner tubes, it is safety-critical. Tube tricks
[This section by John Allen]
Tipps und Tricks
Fahren auf einem platten Reifen...
Because a tire's outer diameter is greater than the rim's, a flat tire "creeps" forward (!) as the bicycle is rolled, and pulls the inner tube with it -- except the valve, caught in the valve hole. With a double-wall rim or a valve stem secured by a jam nut, the tube will only bunch up behind the valve. With a single-wall rim, the valve stem increasingly leans backward. You need only roll a bicycle a few feet for this to happen. Assuming that the inner tube is still intact, you may be able to rearrange the inner tube by rolling the bicycle backwards before inflating the tire. Once done, push the tire sidewalls in all around and take a look to check that the tube is intact and seated properly inside the tire. Deflating and packing an inner tube
So, after replacing an inner tube during a ride, you want to take it home to patch it (or maybe just to avoid being a litterbug). You need to flatten it completely and roll it up. Here's how.
- Open the valve to let air out. With a Schrader tube, you use a valve cap with a wrench to loosen the valve core, as already described. A bobby pin is reported also to work. With a Presta or Woods valve, loosen the knurled nut.
- Roll up the inner tube tightly starting directly opposite the valve, to push all of the air out through the valve.
- With the inner tube rolled up tightly, close the valve, and replace the valve cap.
- Unroll the inner tube and roll it up again starting at the valve. This way, it will protect the valve.
- Wrap an old toe strap, or a rubber band -- which might have come with the replacement inner tube -- around the rolled-up inner tube to hold it together.
Modifikation eines Schrader Ventils
Suggested by Aaron Goss...It is possible to cut the spring off a long-type Schrader valve core as shown in the photo below, and to remove the pusher pin from the pump hose. Air pressure will then close the valve and prevent leakage as the hose is unscrewed. The seal inside the valve is not as good without the spring: a metal valve cap with a rubber seal should be used. So you can also inflate a tire with an unmodified Schrader valve, you must carry two pump hoses, one with and another without the pusher pin. Is it worth all this trouble to make a retro pump work better? Decide for yourself!
Cutting a Schrader valve core Cutting a Schrader valve core
Was man mit einem alten Schlauch machen kann
An old inner tube can be cut crosswise to make rubber bands, for example, to hold together a flattened, rolled-up inner tube. If you need the rubber band to be longer, cut the tube diagonally.
To make a rubber grip for a length of pipe: Cut an inner tube crosswise at one place near the valve. Place a length of metal pipe -- larger than the inner tube's uninflated cross-section -- inside a length of larger-diameter pipe which is closed at one end. Stretch one end of the straightened inner tube over the end of the larger pipe, and hold it in place with a hose clamp. Clamp the other end off. Pump in air, inflating the inner tube. Stand the assembly up so the smaller pipe slides down inside the inner tube, then let out the air. Trim off the ends of the inner tube, leaving the smaller pipe with a rubber, cushioned grip surface.
Old inner tubes may be used like bungee cords. MIT Professor Dr. David Gordon Wilson, author of the book Bicycling Science, could have afforded any kind of bike rack for his car, but he made one with a wooden frame, with numerous old bicycle inner tubes to secure the bicycles. The bike rack worked fine.
Inner tubes may be used as springs for trampolines, catapults, slingshots and the like. I leave the details up to your imagination.
Weaving: Intact inner tubes can be woven into a fabric and stretched inside a frame, looping over the rods at the four edges to make a resilient platform -- to return a thrown baseball, etc. There are even examples of clothing made by weaving together strips of old inner tubes, but I imagine that it is rather clammy!
Siehe auch
- Fahrradreifen und -schläuche
- Platte Reifen
- Werkzeuge und Hilfsmittel für die Arbeit an Fahrradreifen
- Reifengrößen
- Übersicht Reifengrößen (Tabelle)
- Reifen rotieren
- Jobst Brandt on Presta vs. Schrader valves (english)
- Jobst Brandt on flats (go to "Flats" subheading -- several articles) (english)
- Fahrradventil bei Wikipedia.de
Quelle
Dieser Artikel basiert auf dem Artikel About Bicycle Inner Tubes von der Website Sheldon Browns. Originalautoren des Artikels sind Sheldon Brown and John Allen.
<img size=1x1>http://vg04.met.vgwort.de/na/6ab39be7c6bd4d9a9c865e6f43da7962</img>