Details zu Scheibenbremsen
Im Zusamenhang mit diesem Artikel solltest du noch folgende weiterführenden Artikel lesen:
Warum Scheibenbremsen?
Mountainbikes hatten zuerst Cantilever-Bremsen und danach Direktzugbremsen, die die Gefahr, den Querzug an einem der Stollen des Reifens zu zerreißen, vermieden. Jedoch sind Mountainbikefelgen oft nass, verschmutzt und gelegentlich verbogen, die den Einsatz von Felgenbremsen schwierig machen.
Scheibenbremsen wurden immer populärer an Mountainbikes und sind auch bei anderen Fahrrädern auf dem Vormarsch.
John Olsen, ein erfahrener Mountainbiker und Ingenieur, berichtet:
Als ich meine erste funktionierende Scheibenbremse am Mountainbike fuhr, waren die Vorteile im Gelände so überwältigend, dass ich jedes Fahrrad so schnell wie möglich auf Scheibenbremsen umrüstete. Naben, Felgen und Speichen konnten im Grunde unverändert bleiben. Nur eine Scheibenaufnahme an der Nabe wurde nötig.
Für Fahrräder, die ausschließlich auf der Straße unterwegs sind, sind die Vorteile des Scheibenbremsensystems nicht so zwingend. In einiger Hinsicht sind sie nur ein Modeausdruck, der die Praxis an motorgetriebenen Fahrzeugen imitiert
Man sollte beachten, dass Scheibenbremsen nicht einfach so nachgerüstet werden können, ohne Änderungen am rahmen vorzunehmen. Eine Vorderradscheibenbremse setzt eine Gabel höheren Kräften aus und kann unter Umständen das Laufrad aus dem Ausfallende ziehen, wenn man keine spezielle Nabe und Gabel einsetzt.
- Siehe auch
Es folgt nun eine längere Auflistung von Vor- und Nachteilen des Scheibenbremsensystems.
Vor- und Nachteile von Scheibenbremsen
Vorteile
- Scheibenbremsen mit großen Bremsscheiben sind sehr kräftig. Manche Scheibenbremsen mit kleinen Bremsscheiben sind deutlich weniger kräftig und tendieren zu Bremsschwund.
- Man braucht wenig Handkraft am Hebel bei guten Scheibenbremsen.
- Scheibenbremsen sind nicht über dem Reifen verlegt, so dass anders als bei Felgenbremsen keine Designkompromisse beim Reifen eingegangen werden müssen.
- Sie sind kaum anfällig gegen Nässe
- Sie setzen sich weder mit Matsch noch mit Schnee zu.
- Verbogene oder außermittig laufende Felgen beeinflussen nicht die Bremswirkung
- Es besteht nicht die Gefahr, dass ein Bremsschuh den Reifen beschädigt oder sich in den Speichen verfängt.
- Da Scheibenbremsen sich außerhalb der Nabe befinden gibt es keine Besonderheiten bei der Schmierung wie bei der Rücktrittbremse zu beachten. es besteht nicht die Gefahr durch Schmierung die Bremse zu kontaminieren (wie bei der Trommelbremse. Die Nabe überhitzt nicht bei langen steilen Abfahrten.
- Die Bremse kann Hitze abgeben ohne den Reifen in Gefahr zu bringen. das ist besonders wichtig wenn sie bergab als schleifende Bremse zu Geschwindigkeitskontrolle beim Tandem oder Transportrad eingesetzt wird.
- Die Felgen werden nicht verschlissen. das ist insbesondere bei Sand und Matsch oder Carbonfelgen ein Thema. Sie hinterlassen keinen schwarzen Staub (Verschleißpartikel) auf Aluminiumfelgen, der die Hände verschmutzt, wenn man das Laufrad aus- und einbaut.
- Man kann Modifikationen vornehmen, die bei Felgenbremsen nicht möglich wären. So könnten man beispielsweise reflektierendes Klebeband auf die Felgenflanken kleben oder Kabelbinder als "Schneeketten" um Reifen und Felgen binden.
- Man kann Laufräder mit unterschiedlichen Felgengrößen am gleichen Rahmen fahren. So kann man von glatten Straßenreifen auf breite Geländereifen mit Profil wescheln und behält dennoch die Tretlagerhöhe bei.
- Hydraulisch angesteuerte Scheibenbremsen vermeiden das Problem festsitzender Züge wegen zu hoher Reibung.
- manche Scheibenbremsen stellen autoamtisch die Beläge nach, um Verschleiß an Belägen und Scheiben zu kompensieren.
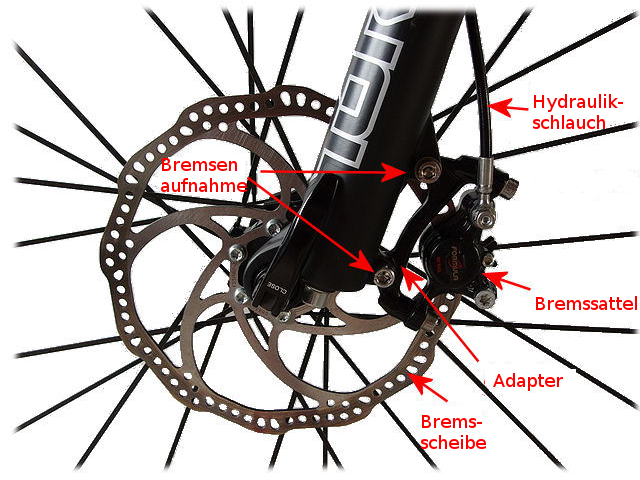
- Die Bremsscheibe kann sehr leicht ausgetauscht werden, wenn diese verschlissen oder beschädigt wurde. Durch Adapter funktioniert das sogar mit Bremseinheiten, die gar nicht mehr produziert werden.
- Manche Fahrradrahmen haben gar keinen Sockel für Felgenbremsen (mehr) und müssen daver mit Scheibenbremsen ausgerüstet werden.
Nachteile
- Die vordere Scheibenbremse belastet eine Gabelscheide sehr stark. Daher ist eine kräftigere und schwerere Gabel notwendig, die bei ungefederten Gabeln in einer holprigeren Fahrt mündet. Wen die Gabel nicht steif genug ist kommt es unter Umständen zu einer Lenkbewegung durch das Bremsen.
- Scheibenbremsen benötigen spezielle Aufnahmen an Rahmen und Gabel sowie spezielle Naben.
- Ist der Bremssattel hinter der Gabel positioniert, wird beim Bremsen eine starke abwärts gerichtete Kraft auf das Laufrad ausgeübt, die bei schlechte Schnellspanner lösen kann und das Laufrad aus dem Ausfallende zieht. Eine spezielle Nabe und eine Gabel mit einem Loch für eine Steckachse vermeiden dieses Problem vollständig.
- Scheibenbremsen und zugehörige Bauteile erzeugen grundsätzlich mehr Gewicht als Felgenbremsen. Bei Carbonfelgen ist das allerdings kein Thema, da diese Felgen nicht für Felgenbremsen ausgelegt sind.
- Scheibenbremsen sind komplizierter, teurer und schwieriger in der Wartung als Felgen- oder Trommelbremsen. Das betrifft insbesondere Hydraulikbremsen, deren Bremsleistung allerdings am besten ist.
- Manche Scheibenbremsen sind sehr giftig. Wenn sich Dreck zwischen Scheibe und Beläge setzt kann das sogar noch verstärkt werden.
- Eine Scheibenbremse unterbindet die Freiheiten, eine Nabe durch umspacern weiter links oder rechts zu positionieren. Die Position der Bremsscheibe ist festgelegt und der Bremssattel muss mit der Bremsscheibe umpositioniert werden.
- Laufrad und Rahmen können nicht einfach so mit anderen getauscht werden.
- Scheibenbremsen können sich mit Gepäckträgerstreben störend überlagern..
- Eine Scheibenbremse kann einen schnellen Laufradwechsel verhindern, wie er im Rennsport notwendig sein kann.
- Disk brake interference with bike rack, photo by Hal ChamberlinThe rotor is vulnerable and easily bent. Other hub brakes do not have this weakness. As the photo at the right shows, caution is needed with bike racks.
- Hub flange spacing is often reduced, resulting in a weaker wheel. Wider overlocknut distance can resolve this problem, at the expense of incompatibility and proliferation of standards.
- It can be difficult to avoid calipers' rubbing on the rotor when the brake is not in use, resulting in some drag and noise.
- Disc brakes howl when wet (though they work better in the wet than rim brakes).
- Pads wear quickly compared with the shoes of rim brakes. It is a good idea to carry spare pads on a long ride, especially under muddy conditions. Fortunately, pad replacement is relatively easy.
- The disc gets extremely hot. It can cause injury if touched, and melt nearby plastic or cloth items. Care must be taken to use the correct brake fluid with a hydraulically-actuated disc brake, so it does not boil, resulting in loss of braking (see additional comments below.)
- There have been complaints of disc rotors' causing injury in crashes (as can chainwheels...).
All in all, disc brakes are advantageous on bicycles which have front suspension and are ridden in mud and snow. A large rear disk brake can serve well as a downhill drag brake on a tandem or cargo bike. Disc brakes are less suitable for bicycles where light weight is most important and the rim can do double duty as a brake disc.
Avid cyclist and bicycle customizer Bruce Ingle has disc brakes on a fatbike he rides in winter, but he also says...
I'm baffled at the appeal of disc brakes for road bikes at this point, practically speaking. I can understand the allure of just swapping wheelsets just to change tire width without changing outside diameter and not needing aluminum rim braking surfaces, but disc brakes howl when wet and they're only slightly less maddening than a chain case to remove and replace a wheel. I've yet to do so without a work stand and tools, since the caliper has required re-centering every time the rear wheel is replaced. Rim and drum brakes don't have this problem, and they can be used with existing framesets.
I certainly can't see disc brakes for pro racing, since they would prevent the 8-second wheel change -- inserting the disc into the narrow slot in the caliper requires some finesse, so you can't just slap it into place.
Sicherheit von Scheibenbremsen
The disc-brake rotor becomes thinner as it wears. A thin rotor is weak and prone to warping or breakage. With most brands, if the rotor is less than 1.5 mm thick, or seriously concave, it should be replaced. Moment Industries specifies 1.7 mm and Hayes, 1.52 mm. See Aaron Goss's Web page, linked below, for details. He also sells thicker rotors for cyclists who are not weight weenies.
As already mentioned, pads also wear. Wear limits are different for different pads -- check manufacturer's specifications.
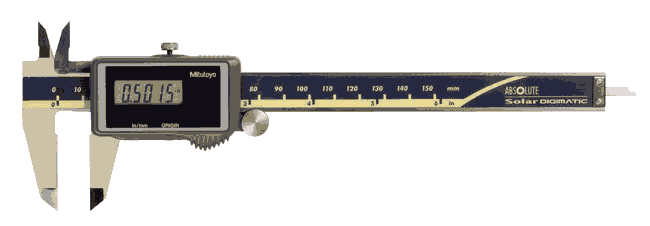
The thickness of a rotor cannot be measured directly with a conventional vernier caliper, due to the concavity.
You need to use a micrometer caliper or you could make a simple accessory tool by cutting and bending a spoke so a length of it lies flat along either side of the rotor. Then a vernier caliper or digital caliper could be used. Subtract twice the thickness of the spoke, and you have your measurement.
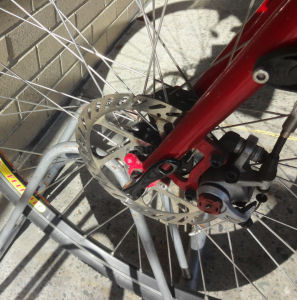
Disc brakes are traditionally mounted on the left side of the bicycle. Some motorcycles have dual disc brakes, one on each side of the front wheel, but the added weight would be undesirable on a bicycle. One-sided mounting results in an unbalanced load on the fork, potentially leading to handling and safety issues. The load on the fork is heavy because the torque from braking is taken up at a relatively short distance from the hub.
As already noted, a front disc brake with the caliper in the usual position behind the left fork blade exerts a strong force tending to pull the hub axle out of the dropout. It has been conclusively shown that the alternation of force upward from weight and downward from the brake can loosen the quick-release of a front hub.
A suspension front fork and a disc brake work well together because the fork must have large-diameter sliders (lower part of each fork blade) and the left slider alone can easily bear the load from the disc brake. However, a through-axle front hub (one where the axle mounts into holes rather than slots) is still necessary to avoid the possibility of front-wheel loss. A disc brake caliper placed ahead of the fork blade would tend to pull the hub axle into rather than out of the fork, but is not usual.
There has been a recall of over 1 million Trek bicycles where the quick-release lever can open more than 180 degrees and catch on the disc rotor, resulting in ejection of the wheel. This problem is not limited only to Trek bicycles. It might also be possible for the lever to catch on the spokes of a wheel without a disc brake.
A front drum brake or Rollerbrake, by way of comparison, also exerts an unbalanced load on the fork, but does not tend to pull the wheel out of the dropout.
It goes without saying that the cable to any front hub brake on a suspension fork must be run in housing, but the cable to a front hub brake with a rigid fork must also be run in housing, because flexing of the fork during braking can tighten the cable and lock the brake.
Long descents generate significant heat, so much so that first-generation disc brakes had a problem with failures due to the glue on the pads melting and brake fluid boiling. Shimano has gone to great lengths to overcome these problems, including heat sinks on the pads, and rotors with aluminum cores and cooling fins. Shimano explains that discs are the future for carbon rims, as no one has found a good solution for rim brakes on rims with a carbon braking surface. Shimano was able to convince the UCI, which had banned discs on road bikes, to change its position after providing evidence of the large number of crashes caused by the shortcomings of caliper brakes on carbon rims.
Montage und Einstellen
Disc brake rotors are available in several sizes. While it is possible to mix and match brands of rotors and calipers, the size of the rotor and caliper must match. Larger rotors are a bit heavier, but dissipate heat more readily and make for stronger braking. Smaller rotors, generally for "road" disc brakes, are lighter.
Most mechanical disc brakes use the same long-cable-pull brake levers as direct-pull brakes. Other brake levers do not pull enough cable, resulting in weak braking. "Road" disc brakes, on the other hand, work with ordinary brake levers and brake-shift combination levers.
There are several common ways to attach the rotor to the hub. Common ones are the 6-bolt ISO, Shimano Centerlock splined, Hope 3-bolt and Rohloff 4-bolt. Some older patterns are no longer in production, making it hard to find a replacement rotor for an older hub. Shimano Alfine internal-gear hubs have the Centerlock disc-brake fitting. The Shimano Inter-M fitting, used on Shimano Nexus and Nexave hubs, is for the Shimano Rollerbrake, and not for a disc-brake rotor. An adapter, from Cesur, in Germany, has been available to mount a disc brake on a Nexus hub.
There are also different ways to attach the caliper. A large variety of adapters is available, making many combinations possible.
Rotor-caliper alignment is critical so the rotor turns freely except when braking. Though some calipers are adjustable, there is little flexibility in adding or removing spacers at the left side of the hub to address wheel dishing, dropout spacing or chainline.
All in all, there is too much variety among disc brakes to cover here, and it is most prudent to stay with manufacturers' suggested combinations. Chapter 11 of the 7th Edition of Sutherland's Handbook for Bicycle Mechanics has very extensive coverage of disc brakes, and especially of the many types of fittings and adapters. Any good bicycle shop will have a copy. John Olsen has good technical information in the book High Tech Cycling, and the disc-brake part of the book is online as a preview. (But, buy the book -- there's more good reading there too!). Park Tool has good information online about installing and adjusting disc brakes. See links below.
Siehe auch
- Anmerkungen zu Scheibenbremsen und Schnellspannern im Artikel über Schnellspanner
- Sheldon's 2004 Adventure Cyclist article about disc brakes
- Sheldon's 2007 Adventure Cyclist article comparing brake types
- Sheldon's article about quick-release and hub design
- Sutherland's home page
- James Annan on front-wheel loss with disc brakes
- Aaron Goss on rotor and pad thickness (scroll down page)
- Video about disc-brake installation
- Park Tool page about disc brake adjustment
- Park Tool page about rotor installation and service
- John Olsen on disc brakes
Quelle
Dieser Artikel basiert auf dem Artikel Disc Brakes von der Website Sheldon Browns. Originalautor des Artikels ist John Allen.


