Gute und schlechte Schnellspanner
Laufräder mit Schnellspanner haben einen [Exzenter]]mechanismus, der es erlaubt, ein Laufrad schnell ohne zusätzliches Werkzeug auszubauen. Schnellspanner werden manchmal auch bei Sattelstützen, Vorbauten und Bremsen verwendet. Es gibt die Legende das Tullio Campagnolo 1927 sein Hinterrad nicht wenden konnte, um in einen anderen Gang zu wechseln als er über den Croce d'Aune Pass in den italienischen Alpen fahren wollte. Seine eingefrorenen Finger waren nicht in der Lage die Flügelschrauben an seinem Hinterrad zu lösen. Dieser Vorfall soll zu der Erfindung des Schnellspannermechanismus geführt haben, die zum ersten mal in den frühen 1930er Jahren vermarktet wurden. Jedoch haben kürzlich Forschungen des Fahrradhistorikers David Herlihy aufgedeckt, dass Campagnolo nicht auf den Startlisten dieses legendären Rennens auftaucht.
Ein Schnellspanner klemmt sich gegen die äußeren Flächen der Ausfallenden des Fahrrads. Diese werden gegen die äußeren Muttern (oder ähnliche Oberflächen bei speziellen Naben mit Patronenlagern) gedrückt,
Der Spieß ist eine Stange, die durch das innere der hohlen Nabenachse passt. Der Schnellspannermechanismus ist aus einem Hebel, dem Exzenter, dem Spieß, zwei konischen Federn und einer Hutmutter aufgebaut wie man unten im Bild erkennen kann. Manchmal muss der Schnellspanner aus der Nabe entfernt werden, wenn man beispielsweise die Naben werten möchte. Der Spieß wird dazu einfach aus der Nabe gezogen, sobald man die Hutmutter abgeschraubt und die konische Feder entfernt hat. Man sollte immer die Feder und die Hutmutter wieder aufsetzen und -schrauben, wenn man den Schnellspanner lagert, damit sie nicht verloren gehen.

Die konische Feder drückt gegen die Enden der Achsen und zentrieren den Spieß über die Ausfallenden. Das schmale Ende jeder Feder muss gegen das Ende der Achse drücken. Wenn man den Schnellspanner schließt, werden die Federn zusammengedrückt und das breite Ende passt in eine Vertiefung des Exzenters bzw. der Hutmutter. Wenn eine Feder andersherum eingebaut wird, verformt sie sich beim Schließen des Mechanismus.

Der Schnellspanner funktioniert natürlich auch ohne diese Federn. Jedoch ist der Einbau des Laufrades etwas schwieriger, weil man den Spieß mit der Hand mittig halten muss, damit er in die Ausfallenden rutscht.
Die Hutmutter hat normalerweise ein geriffeltes Formstück, so dass man den Schnellspanner bei Aus- und Einbau nicht neu einstellen muss. Sollte die Gabel jedoch Lawyer Lips haben, muss man das jedoch trotzdem machen. Mehr dazu später...
Eine Sattelstütze oder ein verstellbarer Vorbau können mit einem Schnellspannermechanismus, der einen kürzeren Spieß hat, gesichert werden. Um den inneren Mechanismus besser erkennen zu können ist im folgenden Bild der Schnellspanner auseinandergebaut.

Ein Laufrad mit Schnellspannermechanismus einbauen
Ein klassischer, korrekt montierter Schnellspanner ist sogar gegen die Kettenkräfte eine Tandems sicher. Dabei ist korrekte Montage jedoch essentiell.
Die korrekte Passform überprüfen
Insbesondere bei einer neuen Kombination aus Laufrad und Rahmen oder nach einem Schaden sollte man sicherstellen, dass alles zusammen passt.
Der Mutternabstand der Nabe muss der Einbaubreite zwischen den Ausfallenden entsprechen. Die Achse muss in die Schlitze des Ausfallenden passen und sich gerade ausrichten lassen. Drehe das Laufrad und prüfe, ob die Enden eiern. Das geht am einfachsten, wenn der Schnellspanner entfernt wurde. Die Achse der Nabe darf nicht über die Außenseiten der Ausfallenden hinausragen, sonst drückt der Schnellspanner nur gegen diese Achsenenden und das Laufrad bleibt lose. Das Problem besteht manchmal bei gepressten Stahl-Ausfallenden bei älteren Fahrrädern. In diesem Fall muss man die Achsen kürzen oder das Laufrad bei einem Fahrrad mit dickeren Ausfallenden benutzen. Bei Dachträgern am Auto kann dieses Problem ebenfalls auftreten. Daher sollte man das dort ganz besonders gründlich prüfen.
Man sollte prüfen, ob der Spieß des Schnellspanners gerade ist und sich frei im Inneren der Achse bewegen lässt. Die Hutmutter sollte nicht wackeln, wenn man von der gegenüberliegenden Seite fest schraubt. Man sollte genau schauen, ob die Ausfallenden korrekt ausgerichtet sind, so dass die Außenmuttern der Nabe exakt plan aufliegen können. In einem weiterführenden Artikel kann man mehr erfahren, wie man das prüft und eine Ausrichtung vornimmt. Man kann natürlich auf das Laufrad hernehmen, um schnell zu prüfen, dass die Ausfallenden parallel sind. Wenn man den Schnellspanner nur leicht befestigt, dürfte man keine keilförmige Lücke zwischen Muttern und Ausfallenden sehen. Sieht man eine solche keilförmige Lücke, darf man den Schnellspanner keinesfalls richtig fest anziehen, weil man sonst den Spieß oder die die Achse biegt. Das verschließen des Schnellspanners sollte abrupt erfolgen und die Kraft zum Umlegen des Hebels sollte sich im Folgenden kaum ändern. Weichliches oder federndes Bindungsgefühl ist ein Zeichen für schlechten Sitz. Nach dem Verschließen und wieder Entfernen sollten die "Bissspuren" der Nabenmuttern und des Schnellspanners auf beiden Seiten kreisförmig gleichmäßig tief um die Ausfallendenflächen angeordnet sein.
Der Hebel des Schnellspanners muss beim Hinterrad auf der linken Seite sein, damit das Schaltwerk keinesfalls mit ihm in Berührung kommen kann. Demnach befindet sich die Hutmutter auf der rechten Seite des Fahrrads und wird dort auf den Spieß aufgeschraubt. Normalerweise ist der Hebel beim Vorderrad ebenfalls auf der linken Seite. Jedoch gibt es einige Bike Friday Falträder, die sich besser falten lassen, wenn der Hebel rechts ist.
Der Schnellspanner ist ein Klemmmechanismus und funktioniert nicht wie eine Flügelschraube. Man dreht den Hebel auf der linken Seite gegen die Hutmutter auf der rechten Seite, um das Klemmen vorzubereiten. Damit sichert man noch nicht das Laufrad gegen Herausfallen.
Ein Laufrad einsetzen
- Stand on the left side of the bicycle. With the quick-release lever in the open position, insert the wheel into the dropouts. A front wheel, or a rear wheel on a frame with vertical dropouts or adjuster screws, should go all the way into the dropout slots. A rear wheel on a bicycle with a derailer adapter claw should go all the way into the adapter claw on the right side. Gravity slides the wheel and frame together if the wheel is resting on the ground, or if the bicycle is upside down.
The photo below shows a hub inserted into the dropouts. Because the quick release is in the open position, there is a gap between the cam body and the dropout. The green arrow points to that gap.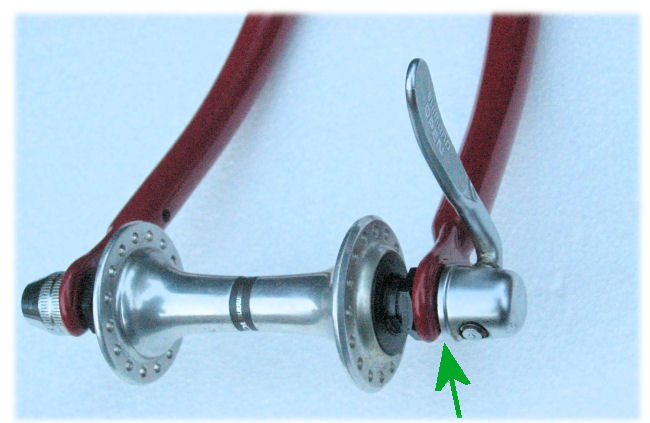
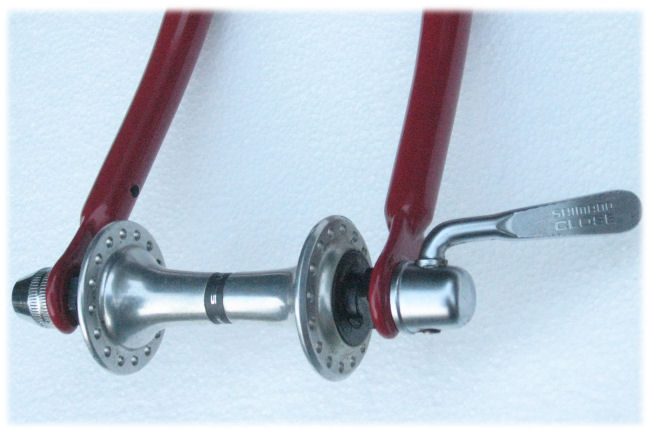
- While holding the lever with your left hand, reach over the wheel and turn the adjusting nut with your right hand until the gap between the cam body and dropout is closed with the lever sticking out at approximately a 70-degree angle from the wheel, as shown in the photo below. The cam body and adjusting nut are resting lightly against the dropouts.
- A rear wheel on a bicycle with horizontal dropouts and without adjusters may have to be centered manually between the chainstays. If the bicycle is resting on its wheels, prop it against your left hip and hold the wheel at the chainstays with your left hand, while closing the quick-release lever lightly with your right hand. Once the quick release is holding the wheel centered, you may switch one hand to the frame or saddle to hold the bicycle steady while you press the quick release lever home with the other hand.
- Press the lever toward the wheel as far as it will go in the direction shown by the green arrow in the photo below. This should require enough force to leave an imprint on the palm of your hand. You should feel the lever bottom out against a hard stop, and it should now be at a right angle to the hub axle. You may have to readjust the adjusting nut a couple of times to get the correct clamping force. The photo shows the wheel ready to ride, or it would be if there were a wheel and not only a hub!


The cam of a quick-release goes "over the top" so the quick release actually loosens very slightly when the lever is pushed all the way down. Vibration then tends to hold the quick release closed, rather than to open it. If the quick release is overtightened to it does not press down all the way, it will loosen.
The tension on the quick-release skewer compresses the hub axle slightly and can put hub bearings out of adjustment. Another article on this site describes how to check for correct adjustment.
Das Laufrad herausnehmen
To remove a wheel, pull the lever out and away from the wheel and follow through until the lever is fully in the open position. Once the clamping force is released, the lever will easily rotate the rest of the way around to the open position. If a front fork has "lawyer lips," or sometimes just because parts don't fit quite perfectly, you must also unscrew the adjusting nut by a few turns. Then hold the wheel with one hand and lift the bicycle off with the other.
Ein Demonstrationsvideo
Removal and replacement of a quick-release rear wheel is easy too if you know where to stand and how to hold the bicycle. The video below shows how.
Removing and replacing a rear bicycle wheel from John Allen on Vimeo.
Messen eines Schnellspanners, um Ersatz zu besorgen
Sometimes it is necessary to replace a quick-release mechanism, or you may wish to replace a conventional skewer with an anti-theft one. Unless you can take the old one with you when buying a new one, you need to know its dimensions. The three important dimensions are diameter, threading and length.
- Diameter: the skewer must fit inside the hollow hub axle. You may measure either the inside diameter of the axle, or the diameter of the present skewer. Most axles use a 5mm thick skewer. Skewers for wheels made for suspension forks may be 9mm (front) and 10mm (rear) in diameter. Skewers for seatposts and stems are commonly 6mm in diameter. Do not use an undersize skewer.
- Threading: it is only important to know this if you are replacing the skewer or the adjusting nut independently of the other. 5 x 0.8mm is most common; 5 x 0.9mm and 5 x 0.75mm are found on older French skewers. Measure with a thread-pitch gauge, or keep a selection of adjusting nuts if you restore older French bicycles and the skewers absolutely must be authentique!.
- Skewer length depends on the distance between the outside faces of the dropouts, and the depth of the adjusting nut. It is easiest to measure the distance between the outer faces of the dropouts after removing the wheel. This distance must match the length of the skewer from the base of the cam body to the base of the adjusting nut. Some anti-theft replacement skewers have thin nuts and shorter skewers, but if you know the spacing between the outside faces of the dropouts, you will be able to specify the correct replacement regardless of the skewer design. Most front hubs have an overlocknut distance of 100mm. Rear overlocknut distance may be anything from 110mm for older bicycles with a single rear sprocket up through 160mm for tandems. 130mm is most common on newer road bicycles, and 135mm on mountain bikes. Dropout thickness, counting both sides, ranges from 8mm for stamped steel dropouts to 20mm for aluminum dropouts. A derailer adapter claw, trailer hitch or other accessory may add to the length.
Effective length of a quick-release skewer
Skewer length measurement
Sekundäre Rückhaltesysteme
Starting with the "bike boom" of the early 1970s, multi-speed, derailer-equipped bicycles were increasingly sold to unsophisticated customers. People would use the quick-release like a wingnut, or would close it without clamping it tight, or would overtighten the adjusting nut so the lever would not push down all the way. A vandal also might intentionally loosen a quick release. A skewer can break if it was bent, or if it is overtightened with gorilla force, or defectively manufactured. A bent dropout might not secure the wheel. Disengagement of the front wheel resulted in nasty crashes, and lawsuits, and led to the introduction of secondary retention devices.
Your first line of defense against wheel loss is to install wheels correctly; your second is to check the bicycle before you ride. A secondary retention device is intended to hold the wheel in place in case these measures fail.
Secondary retention devices are of three basic types:
Schwinn-Haken
One type, invented by Schwinn engineer Frank Brilando, uses clips attached to the hub axle inboard of the locknuts, and which hook over pegs at the inside of the fork blades. This device is quick to operate, and holds the wheel in place even if the quick-release skewer breaks and falls out. A modified hub and fork are necessary. I've only ever seen this device on Schwinn bicycles. The drawing below is from Brilando's patent.
Brilando patent drawing
Here's a rather rusty but still serviceable Schwinn clip found in the wild.
Schwinn clip
Ausfallende-Haken
A second type of device uses clips which attach to the dropouts. Brilando invented such a device, shown in the patent drawing below -- before he came up with his better idea. Brilando's dropout clips require special dropouts but work with any hub. The quick release must be loosened to remove the clips. This device acts as a washer, and makes the connection between the hub and fork less secure. Other similar devices rotate around the skewer and clip to the dropout. Those don't hold the wheel if the skewer breaks or falls out, and can easily be removed after unscrewing the quick release's adjusting nut..
Earlier Schwinn retention device
Lawyer Lips
Most common, however, are the so-called "lawyer lips" -- raised margins on the fork dropout to retain the quick release's cam body and adjusting nut. More than the other devices, "lawyer lips" complicate wheel removal and replacement, because the quick-release adjusting nut must be unscrewed by several turns to remove the wheel, then screwed back down and adjusted to replace it. "Lawyer lips" do work with any hub, and they avoided payment of royalty fee to Schwinn. Brilando's patent, however, expired in 2006!
There are scuffs on the dropout faces in the photo below: the quick release was loose, and the wheel moved around in the dropouts, despite the "lawyer lips". Also note the uneven depth of the scuff marks. These cheap dropouts, formed by crushing the ends of the fork blades, do not have perfectly flat surfaces.
Dropout with "lawyer lips"
No secondary retention device secures the wheel as well as the quick release itself. A device which relies on the skewer to hold the wheel offers no protection if the skewer breaks.
Auswahl des richtigen Schnellspanners
A quick-release skewer should be of steel. Quick releases with titanium and aluminum skewers are made, to save a few grams of weight. Steel is much stronger, and a steel skewer weighs only a few grams more.
The skewer should be of one piece with the cam body, and their junction should be rounded, to avoid a stress-raising sharp transition.
When you close the skewer, your hand strength is accomplishing two things: It's applying a clamping force to the skewer, and it's overcoming the mechanical friction of the mechanism.
Quick-release mechanisms come in two distinct types: enclosed cam and exposed cam designs.
Geschlossener Exzenter
Internal Cam Skewer
The original type of quick release skewer, invented by Tullio Campagnolo, features a steel cam surrounded by a solid metal body. The body is the part that moves back and forth as you flip the lever, and usually has teeth to press against the left dropout.
The cam is well-shielded against contamination, and can be lubricated by applying a couple of drops of oil every couple of years.
Offener Exzenter
External Cam Skewer
Sometime in the '80s, a variant type of skewer was introduced, one that is less expensive to manufacture, and is sometimes a bit lighter. This type uses a split external cam that straddles the end of the skewer. External-cam skewers use a curved plastic washer between the cam and the toothed metal washer that presses against the dropout.
This type was originally marketed as an "upgrade" because it could be made a little bit lighter.
Despite the marketing hype associated with these "boutique" skewers, they are actually considerably inferior in functionality to the traditional type. They are often seen under rather prestigious names, as was the one photographed here. (I Photoshopped the logo off, so as not to pick on one particular brand.)
The exposed cam cannot be kept as clean and well-lubricated as the shielded one can.
In addition, the exposed cam has a larger diameter, (typically 16 mm vs. 7 mm for an enclosed cam) so the friction is acting on a longer moment arm (the radius of the cam.)
The result is that the exposed-cam type provides very much less clamping force for a given amount of hand force on the lever.
Fortunately, the move toward "boutique" skewers happened after the industry had mostly moved to frames with vertical dropouts and forks with "lawyer lips."
The exposed-cam skewers are generally OK for vertical dropouts in back, and for forks with "lawyer lips", but should not be relied on with horizontal dropouts or plain forks.
Design der Hutmutter
Good-quality skewers have acorn nuts with steel serrations that can bite into the face of the dropout, so the wheel won't slip, but most of the "boutique" skewers have soft aluminum parts in this position, presumably to save weight.
The aluminum "teeth" are too soft to get a good grip on the dropout. Since the chain pulls on the right side of the hub, where the acorn nut commonly resides, this type of skewer is almost always unsatisfactory for use with a frame that has horizontal dropouts. In addition, "boutique" skewers generally have (yuck!) aluminum threads, vs. the steel threads of the two-piece acorn nuts. The aluminum threads are much easier to strip. DESCRIPTION One-piece aluminum acorn nut. Aluminum threads and teeth. Aluminum acorn nut with steel insert.
As a result of these design flaws, "boutique" skewers should not be used on frames with horizontal dropouts, nor on older forks that don't have "lawyer lips."
Vitrinennaben
There are two problems with the hub in the image below. One is obvious, and is discussed in our article on wheelbuilding. The other problem is the smooth face of the axle end, which does not bite into the dropout. This is less secure than a serrated axle end or locknut.
Hub with broken flange and smooth axle end
Schnellspanner-Roulette
There have been reports of a particularly nasty failure mode with the exposed-cam type skewer, related to the radiused plastic washer. If the user isn't careful, sometimes this washer can get rotated 90 degrees, so that the cam presses on the flats as shown in the photo below, rather than sitting in the valley of the curved side of the washer. This creates a likelihood that the skewer can rotate if it becomes loose, so that the cam falls into the valley. When this happens, the quick-release becomes so loose that the wheel can fall out, even if a front fork has "lawyer lips".
.external-cam quick-release hazard
Probleme bei Scheibenbremsen
James Annan has created something of a storm in the industry by pointing out a serious safety risk to users of front disc brakes with traditional forks. He has identified a mechanism whereby the forces generated by the disc brake can cause the skewer to loosen up in use!
This failure mode is possible even with the better skewer designs, but it's more likely with the external-cam type. James Annan's article on disc ejection Our article on disc brakes
Siehe auch
Quelle
Dieser Artikel basiert auf dem Artikel Bicycle Quick-Releases von der Website Sheldon Browns. Originalautor des Artikels ist Sheldon Brown und Ergänzungen von John Allen.