Kurbeln ohne Splintbefestigung: Unterschied zwischen den Versionen
(→Staubkappe entfernen, außer...: typos) |
(→Verwendung des Kurbelabziehers: Bilder hinzugefügt) |
||
| Zeile 65: | Zeile 65: | ||
Once you have removed the bolt or nut, be especially careful to remove any washers that may be under the bolt head or nut, or you may easily destroy the crank in trying to push the crank puller "bolt" against the washer! | Once you have removed the bolt or nut, be especially careful to remove any washers that may be under the bolt head or nut, or you may easily destroy the crank in trying to push the crank puller "bolt" against the washer! | ||
<center> | |||
''Die Kurbelbefestigungsschraube wurde entfernt. Wir sind für den Einsatz des Kurbelabzieher bereit...'' | |||
[[Datei:Cotterless4sm.jpg|center|Die Kurbelbefestigungsschraube wurde entfernt]] | |||
</center> | |||
Now you are ready to use the crank puller. This tool is a joy to use, and with reasonable care will work every time with no complications. | Now you are ready to use the crank puller. This tool is a joy to use, and with reasonable care will work every time with no complications. | ||
| Zeile 81: | Zeile 82: | ||
But don't overtighten the "nut" of the puller. Most of the time you should not need to use a wrench on it. If you must use a wrench to fully seat the "nut," be gentle! | But don't overtighten the "nut" of the puller. Most of the time you should not need to use a wrench on it. If you must use a wrench to fully seat the "nut," be gentle! | ||
<center> | |||
''Einsatz des [[Kurbelabzieher]]s'' | |||
[[Datei:Cotterless6sm.jpg|center|Einsatz des Kurbelabziehers]] | |||
</center> | |||
Once the "nut" is securely screwed into the crank, tighten the "bolt." The "bolt" will press against the end of the spindle, the "nut" will pull on the crank. Usually, the crank will fall off in your hand with surprisingly little effort, because of the very high mechanical advantage of the tool. Consequently it is hard to realize how much force is being exerted. (On some cranks, most often the less expensive "melt-forged" models, you'll have to apply considerably more effort than this.) | Once the "nut" is securely screwed into the crank, tighten the "bolt." The "bolt" will press against the end of the spindle, the "nut" will pull on the crank. Usually, the crank will fall off in your hand with surprisingly little effort, because of the very high mechanical advantage of the tool. Consequently it is hard to realize how much force is being exerted. (On some cranks, most often the less expensive "melt-forged" models, you'll have to apply considerably more effort than this.) | ||
Version vom 18. August 2020, 07:34 Uhr
Aluminiumkurbeln ohne Splintbefestigung haben Stahlkurbeln mit Splintbefestigung in allen Fahrradbereichen abgelöst (außer bei sehr exotischen und sehr günstigen Fahrrädern). Die Vorteile in Form von weniger Gewicht, leichterer Wartbarkeit und kleineren Fertigungstoleranzen haben Kurbeln ohne Splointbefestigung nach iherer Einführung schnell sehr beliebt gemacht. Bis Mitte der 1980er Jahre hatten die Hersteller die Kostenreduktion so weit getrieben, dass einfach Kurbeln ohne Splintbefestigung nur wenig mehr kosteten als die abgelösten Stahlkurbeln mit Splintbefestigung. Zudem ist die Verbindung zwischen Kurbel und Welle haltbarer bei Kurbeln ohne Splintbefestigung. Splinte brachen oft bei Fixed Gear Fahrrädern oder Tandems.
Anders als Kurbeln mit Splintbefestigung benötigen Kurbeln ohne Spintbefestigung Spezialwerkzeuge, um sie zu montieren oder zu demontieren. Die Notwendigkeit spezieller Werkzeuge ist eine Unschönheit, diese wird aber durch den problemlosen Betrieb locker wieder wettgemacht. Auf der anderen Seite ist beim Einsatz von nicht-spziellem Werkzeug bei Kurbeln mit Splintbefestigung wie der Hammer, einem Dom und einem Betonziegelstein mit mehr Geschick (und Glück) seitens des Mechanikers nötig.
Ein weiterer Vorteil von Kurbeln ohne Splintbefestigun ist die Tatsache, dass die benötigten Werkzeuge nicht viel wiegen und man sie so auf Tour mitnehmen kann. Das würde man bei Kurbeln mit Splintbefestigung wegen des Gewichts nicht wollen.
Um Kurbeln ohne Splintbefestigung zu montieren oder fester anzuziehen, benötigt man einen Steckschlüssel. Um die Kurbel zu demontieren benötugt man einen Kurbelabzieher für Kurbeln ohne Spliuntbefestigung, das zur marke der Kurbel passt. Der Steckschlüssel und der Kurbelabzieher wreden oft in einem Werkzeug kombiniert verkauft. Einige Kurbelen benötigen lediglich einen Inbusschlüssel zur Demontage und zum Ersetzen.
Konifiziertes quadratisches Loch
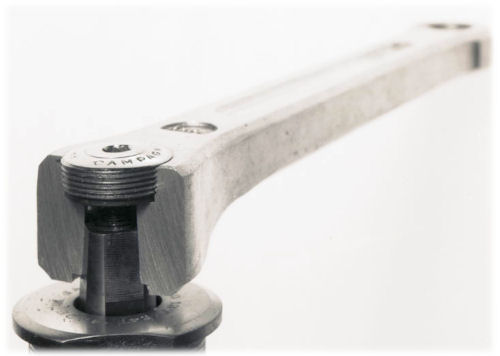
Schauen wir uns einmal an, wie Kurbeln ohne Splintbefestigung mit der Welle eine sichere Verbindung eingeht. Die Wellenenden sind quadratisch im Querschnitt und zu den Enden hin konifiziert, so dass die Enden etwas schmaler sind als die Basis. Die Kurbel hat ein korrespondierendes konfifiziertes quadratisches Loch, so dass die Kurbel über die Wellendenden passt.
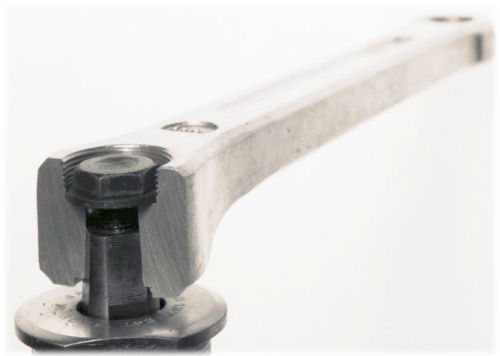
Im folgenden Bild wurde die Kurbel aufgeschnitten, um zu verdeutlichen wie sie auf eine Welle passt und wie die Staubkappe eingeschraubt ist.
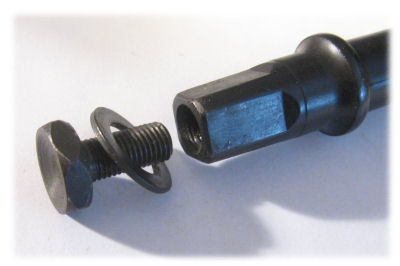
Abhängig von Marke und Modell wird die Kurbel mit einer Schraube oder einer Mutter gesichert. Ältere klassischere Modelle haben ein innenliegens Gewinde. Eine Schraube - oft auch "kurbelschraube" genannt, wird in dieses Gewinde der Welle geschraubt Eie flache Unterlegscheibe unter dem Schraubenkopf ist dabei essenziell. Sutherland's Handbook for Bicycle Mechanics (englisch) nennt diese Art der Innenlagerwelle "Typ I" (Typ eins - es handelt sich im die römische Ziffer I = 1) bzw. in ener späteren Auflage "Schraubentyp".
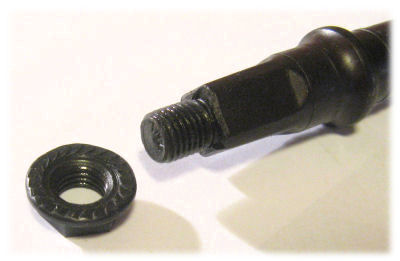
Das alternative Design hat eine Welle mit einem schmalen Sockel mit Gewinde, die aus dem Ende der Vierkantaufnahme der Welle herausragt. Auf diesen Sockel wird eine Mutter geschraubt, die die Kurbel gegen die Welle sichert. Normalerweise ist das eine spezielle Mutter mir integrierter gefurchter Sicherungsscheibe, so dass keine separate Unterlegscheibe benötigt wird. Bei Sutehrland wird dieses Design "Typ II" (Typ 2) oder "Mutterntyp" genannt.
Ende der Vierkantaufnahme mit Mutter und Gewinde. Die gefurchte Seite der Mutter drückt gegen die Kurbelaußenseite.
Einige neuere Kurbelsätze haben eine Keliverzahnung zwischen Welle und Kurbel. Mit Ausnahme einiger Details funktioniert hier Kurbelabbau und -montage wie auch bei der Vierkantaufnahme.
Staubkappe entfernen, außer...
Es ist grundsätzlich eine gute Idee, wenn man Kurbel und Welle markiert, damit man sie wieder in der gleichen Orientierung zusammenbaut, so dass sie auf die gleiche Weise wieder zueinander passen.
Wenn man einen sechs, sieben oder acht Millimeter Inbusschraubenkopf sieht, kann es sein, dass man die Kurbel ohne Kurbelabzieher abbauen kann. Manchmal kann es auch einfach eine in die SChraube integrierte Staubkappe sein. Das kann man leicht selber testen, indem man mit einem Inbusschlüssel versucht, die Schraube zu lösen. Wenn durch das Abschrauben auch die Kurbel mit abgezogen wird, kann man einige der folgenden Schritte bis zur Diskussion von Entfernen mkt nur einem Schlüssel überspringen. Wenn mit der Schraube eine Staubkappe integriert ist, springe zum ABschnitt über Kurbelabzieher.
In alen anderen Fällen, löst man nun die Staubkappe, falls vorhanden. Manche Kurbeln haben Einschnapp-/Aushebel-Staubkappen, statt der Einschraubvarianten. Manche Staubkappen lassen sich mit einem fünf Millimeter Inbusschlüssel oder einem breiten Schraubendreher herausschrauben. (Keinen kleinen Schraubendreher benutzen, weil man sonst Gefahr läuft, den Schlitz zu beschädigen - die meisten Staubkappen sind aus Plastik oder weichem ALuminium). Wenn man keinen großen Schraubendreher zur Hand hat, kann ein Konusschlüssel oder eine 50-Cent Münze gut in den Schlitz passen. Manche Campagnolo Staubkappen der Jahre 1990 bis 1996 mit selbstextrahierenden Kurbelschrauben werden im Uhrzeigersinn gelöst. In diesen Fällen muss man einen KIurbelabzieher bie diesen wertvollen Camapgnolo Kurbeln bemühen oder diese mit einer Lötlampe erhitzen (siehe weiter unten), weil Kurbelabzieher für Linksgewinde extrem selten sind!
Wenn die Staubkappe entfernt wurde, kommt die Befestigungsschraube (oder -mutter) zum Vorschein.
Man beachte: Dort ist eine Unterlegscheibe unter dem Schraubenkopf.
Als nächstes löst man die Befestigungsschraube oder die Mutter, die die Kurbel auf der Welle hält. Da die Schraube oder Mutter in einer Versenkung der Kurbel zurückversetzt liegt, benötihgt man einen Steckschlüssel, damit man sie drehen kann. Wenn man eine Mutter vorfindet, hat diese 14 mm. Bei einer Schraube findet man normalerweise einen 15 mm-Kopf; Stronglight und Zeus Kurbeln haben einen 16 mm-Schraubenkopf.
Im professionellen Werkstatteinsatz setzen viele Mechaniker Ratschen-Steckschlüssel aus dem Automobilbereich ein. Das funktioniert auch sehr gut.
Wenn man diese Art von Schlüssel verwenden will, kann man Schwierigkeiten haben, Steckschlüsseleinsätze zu finden, die die richtige Größe für den Schraubenkopf haben und gleichzeitig schmal genug sind, dass ihr Außendurchmesser in das Staubkappengewinde passt. Das ist bei 14 mm Steckschlüsseleinsätzen meist kein Thema, aber bei vielen 15 mm oder 16 mm Einsätzen ist der Außendurchmesser zu groß, um hineinzupassen. Es ist legendär schwierig, eine 16 mm-Schraube aus einem Campagnolo Staupkappenloch einer Zeus-Kurbel zu lösen. Sobald man die Schraube herausgedreht hat, kann man sie durch eine Schraube mit 14 oder 15 mm Schraubenkopf ersetzen.
Üblicherweise haben Steckschlüsselsätze höherer Qualität dünnere Wände als die billigen Werkzeuge. Billigere Steckschlüsselsätze ersetzen Stahl schlechterer Qualität durch mehr Volumen. Steckschlüsseleinsätze gibt es in sechseckiger oder zwölfeckiger Form. Sechseckige Einsätze haben meist etwas dünnere Seitenwände, so dass sie wahrscheinlich eher passen werden. Bei Ratschenschlüsseln werden sechseckige Steckschlüsseleinsätze im Allgemeinen bevorzugt. 3/8 Zoll Steckschlüsselsysteme sind zumeist schmaler als diejenigen mit 1/2 Zoll Systemen.
Halte die Kurbel fest, damit sie sich nicht drehen kann, wenn man das Werkzeug benutzt. Das ist normalerweise einfach, weil die Schrauben nicht sehr fest geschraubt sind.
Die Kurbelbefestigungsschraube wid mit einem Steckschlüssel gelöst.
Verwendung des Kurbelabziehers
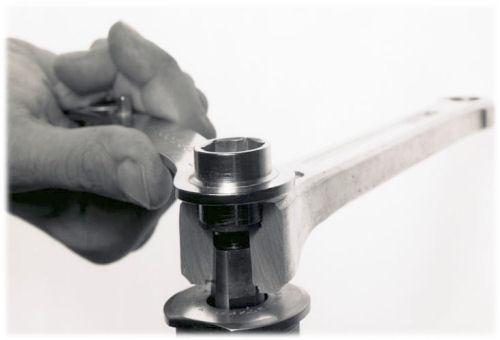
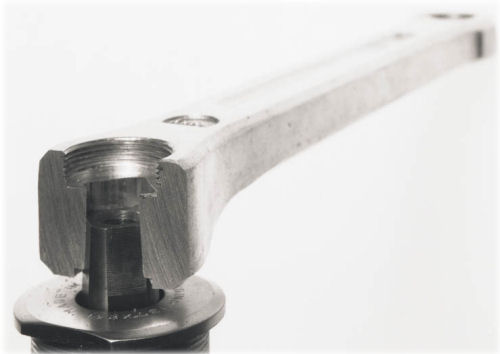
Once you have removed the bolt or nut, be especially careful to remove any washers that may be under the bolt head or nut, or you may easily destroy the crank in trying to push the crank puller "bolt" against the washer!
Die Kurbelbefestigungsschraube wurde entfernt. Wir sind für den Einsatz des Kurbelabzieher bereit...
Now you are ready to use the crank puller. This tool is a joy to use, and with reasonable care will work every time with no complications.
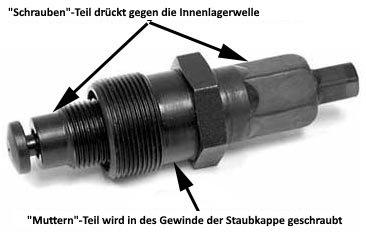
A cotterless crank puller is made up of two parts, one of which is basically a nut and the other a bolt. (The "nut" part is actually a bolt and a nut at the same time! It has both a male and a female thread, plus flats for a wrench.) The "nut's" large male thread fits into the same threads of the crank that the dustcap screws into.
Make sure that the "bolt" part will bear on the end of the spindle. Some crank pullers made for spindles with a protruding boss have a pushing surface with is too large to fit into the square hole in the crank. Using one of these vigorously with a bolt-type (hollow) spindle will only strip out the threads in the crank.
Before you screw the "nut" part of the crank puller into the dustcap threads, the "bolt" part must be screwed back out of the way (counterclockwise) so that it will not hit the end of the spindle while you are screwing the "nut" part into the crank. Otherwise, the "bolt" will keep you from screwing the "nut" all the way into the dustcap threads.
Be sure you screw the "nut" part of the tool all the way into the dustcap threads. These threads will be subjected to severe stress as the crank is removed, and aluminum threads are not noted for their durability!
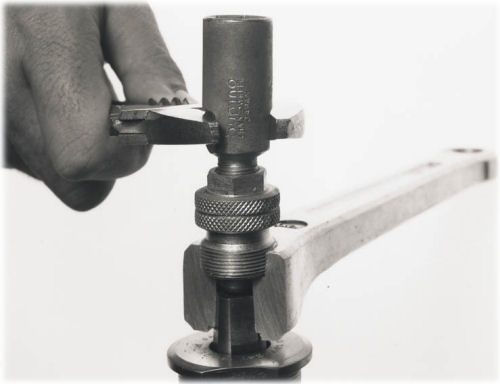
But don't overtighten the "nut" of the puller. Most of the time you should not need to use a wrench on it. If you must use a wrench to fully seat the "nut," be gentle!
Einsatz des Kurbelabziehers
Once the "nut" is securely screwed into the crank, tighten the "bolt." The "bolt" will press against the end of the spindle, the "nut" will pull on the crank. Usually, the crank will fall off in your hand with surprisingly little effort, because of the very high mechanical advantage of the tool. Consequently it is hard to realize how much force is being exerted. (On some cranks, most often the less expensive "melt-forged" models, you'll have to apply considerably more effort than this.)
Kurbelabziehervarianten
Which tool to buy depends on what brand and model of crankset you have. All use the same one-thread-per-millimeter pitch, and most cranksets have a 22 mm diameter for the dustcap threads: Older T.A. had 23 mm; and Stronglight, 23.35 mm. (There are a couple of rare exceptions: Early Lambert cranksets were threaded 7/8-inch by 24 threads per inch. As mentioned earlier, some 1990-1996 Campagnolo cranks have left-hand dustcap threads -- but these were supplied with self-extracting crank bolts)
To service a T.A. crankset, you need a T.A. puller. For Stronglight, you should really use a Stronglight puller, but the T.A. is usable with care (although it fits a bit more loosely than it should. If the crank starts to get hard to pull off, quit before you strip the threads). For any other brand, you have a wider choice available. Here are some things to keep in mind as you shop among the alternatives:
Pullers made primarily for Type I [bolt type] cranksets usually have a rotating collar on the end of the "bolt." This collar is the part that actually pushes against the end of the spindle to pull the crank off. If you use this type of tool on a Type II [nut type] spindle, it will work, but the threaded end of the spindle may damage the pivot of the tool's collar. Also, some Type I pullers simply don't fit on Type II cranksets: the puller's "nut" may interfere with the threaded boss on the spindle, or it may not be possible to unscrew the puller's "bolt" far enough to allow the puller to be threaded into the crank
This crank puller will not retract farther, and so it is usable only with bolt-type cranks.
Crank puller usable only with bolt-type crank
When a tool made for a nut-type spindle is used with a bolt-type (female threaded) spindle, the sides of the "bolt" of the puller rub against the edges of the spindle threads that the crank bolts screw into. There is a slight possibility that the spindle threads could be damaged by this, but bottom bracket spindles are made of such very hard steel that the risk is small. You can solve this problem easily by inserting an undersized bolt into the end of the spindle -- the bolt's head should fit inside the square opening in the crank, but protrude beyond it, so the puller bears on the head of this bolt.
When removing a splined crank which attaches with a larger-diameter bolt, you will need either to use a special crank puller made for this purpose, or to place an undersized bolt on the end of the spindle. This must fit entirely inside the splines of the crank.
Der universelle Kurbelabzieher von Park Tool
The closest thing to a universal crank puller is made by Park. This has a reversible, double-ended "nut," with a tip on one end for square-taper cranksets, and on the other end for splined cranksets. The wrench flats are in the middle. This tool will not fit older TA or pre-1982 Stronglight cranks, though.
If you want to be able to service the greatest variety of cranksets with the minimum of tools, the Park puller is the one to buy. If you are concerned only with being able to service the particular type on your own bicycle, the tool made by the crank manufacturer is probably better, and is lighter than the Park tool. The threads may also be a better fit.
There are several types of socket wrenches suitable for removing and re- installing the crank fixing bolt (or nut). The crank manufacturers all make small, easily carried single-size socket wrenches to fit their fixing bolts.
Wo man keinen Kurbelabzieher benötigt
Some cranks need no puller. Shimano introduced the first such crankset with its One-Key-Release system. Other manufacturers offer similar units. All work the same way.
Instead of the customary 14, 15-mm or 16 bolt, these cranksets use a bolt with a 6, 7 or 8-mm Allen head. This has two advantages: the necessary tool is small and practically weightless, and the Allen head can be exposed through a small hole in the dustcap.
Crank which removes without a puller. Unscrewing the fixing bolt presses it against the dustcap.
Extractorless system
The steel dustcap functions as the "nut" in a standard crank puller, and when you're removing the crank, the fixing bolt functions as the crank puller's "bolt." As you loosen the fixing bolt, the head of the bolt pushes against the inside of the dustcap, pulling the crank from the spindle.
This system is particularly well-suited for touring and for air travel when you need to remove either the pedals or the cranks to put your bicycle into a box. You can adapt other brands of cranks to this system by replacing the dustcaps and fixing bolts. Retrofit kits will work with all Type I spindles (that use a bolt to hold the crank to the spindle) and cranks with 22 mm dustcap threads.
Crank bolts which have an Allen head but are not one-key release generally have a plastic dustcap which is attached to the bolt instead of the crank. Any self-extracting system has a dustcap with slots (as shown above) or holes for a pin spanner so the dustcap can be threaded into the crank.
Letzte Rettung
Extractor threads can get stripped out -- see warnings about compatibility earlier in this article. Or, you may have to remove an older Stronglight, TA, Campagnolo or Lambert crank and not have the necessary crank puller.
A small automotive gear puller can remove a crank. This tool works like a crank puller, except that instead of threading into the crank's extractor hole, it has three hinged arms that hook around the back of the crank. On a right crank, the arms should attach near the spindle so the pull doesn't tend to bend the spider. Getting a gear puller started, especially on a right crank with four or five arms, may require three or four hands to hold all the parts in place. You may need to remove the chainwheels first. Expect that the crank puller will blemish the rear of the crank.
You might also heat the crank. Aluminum has a higher expansion rate than steel, and you may be able to tap on the back side of the crank and loosen it using a hammer and wooden block.
A crank with stripped threads can be reinstalled as easily as any other. If you are working on your own bicycle, you may decide to reinstall it, but removing it later is not a job you would want to pass off on someone else!
If nothing else works, you could hacksaw the crank off.
Ersetzen der Kurbel
Before replacing a crank, check it for cracks starting to form. They could be at the corners of the square hole, at the pedal hole or in mid-crank. They lead to in sudden failure, and very likely, a crash.
The size of the square-tapered spindle ends varies among brands and models, and so, not all spindles are compatible with all cranks. If you are using a new crank or spindle, install the crank loosely and make sure that they mate well. The crank will pull in by about 2 mm when you tighten it, and so the end of the spindle should be recessed by at least 3 mm inside the square tapered hole in the crank. The back of the crank should easily clear the end of the spindle's tapers and the bottom-bracket. At this time, you may also check the chainline, remembering that it will be a couple of mm closer to the frame once the crank is tightened. See the article on bottom-bracket tapers for more detailed information and advice. Also see the articles on chainline.
Grease the threads of the fixing bolt or nut. Also grease the splines of a splined spindle. Much ink has been spilled about whether to grease square-tapered spindles. Jan Heine of Bicycle Quarterly magazine performed an experiment, voted for grease but indicated that some cranks will have problems, greased or not. The tide of opinion seems to be with light greasing.
A square-taper spindle will go on any of four ways, but if you have marked it as suggested earlier, then you can put it back on the same way, and it will not have to adapt iself to the spindle again. You need to make sure a splined spindle and crank match, as there are different kinds. A splined spindle has one spline different from the others. Align this with the corresponding notch in the crank, or you will ruin the crank.
If you are replacing a bolt-type spindle with a nut-type spindle, then at your next rebuild, you will need a crank puller which doesn't interfere with the nut. Also check that the boss on the end of the spindle doesn't prevent the dustcap from threading in all the way. It is best to avoid using a nut-type spindle entirely with an older Stronglight, TA Lambert or (heresy!) Campagnolo crank that can't take a standard crank puller.
The shallow angle of the tapered square hole multiplies the force from the crank fixing bolt or nut by many times. The bolt or nut will continue to turn for half a rotation or so after it first snugs up, before it reaches full engagement and starts getting much harder to turn. Don't use all of your strength. Preferred torque wrench readings are in the range of 350 inch pounds, and a torque wrench is recommended if you don't have well-calibrated hands -- especially with splined cranks..
Cranks tend to loosen after first being installed. They should be retightened after the bicycle has been ridden a few miles. They may loosen again; an early warning of this is a loud "crack-crack" noise with each turn of the cranks. If the bicycle is ridden much at all with a loose crank, the spindle hole will become enlarged and misshapen, and the crank must be replaced.
It is a good idea to carry a wrench to fit the crank fixing bolts. However, loss of crank bolt preload is normal; repeated, routine re-tightening is not recommended. One role of dustcaps is to capture the fixing bolts so they don't fall out and get lost. This can happen without the crank's coming loose. An alternative is to use blue Loctite or similar threadlock compound on the bolt threads.
For a more detailed discussion of crank loosening, see Jobst Brandt's comments. He, too, recommends greasing the square taper.
Siehe auch
Quelle
Dieser Artikel basiert auf dem Artikel Tool Tips Cotterless Cranks von der Website Sheldon Browns. Originalautor des Artikels ist Sheldon Brown.
