Die Sturmey-Archer Sprinter Fünf-Gang-Nabe: Unterschied zwischen den Versionen
(→Einstellen der Gangschaltung: weiter...) |
(→Einstellen der Gangschaltung: übersetzt) |
||
| Zeile 39: | Zeile 39: | ||
==Einstellen der Gangschaltung== | ==Einstellen der Gangschaltung== | ||
Jedes Gangschaltungsysstem darf nicht außerhalb der Jusatge gefahren werden, um Schäden an Gangschaltungskomponenten und Schaltungsprobleme zu vermeiden.[[Datei:sprint5.png | Jedes Gangschaltungsysstem darf nicht außerhalb der Jusatge gefahren werden, um Schäden an Gangschaltungskomponenten und Schaltungsprobleme zu vermeiden.[[Datei:sprint5.png|Schaubild zur Einstellen der Schaltung bei einer Sturmey-Archer Sprinter 5 Nabe]] | ||
# Prüfe, dass die Halterung des [[Zuganschlag]]s (1) (falls vorhanden) sicher und fest an der [[Kettenstrebe]] befestigt ist und mindestens 125 mm (5 Zoll) von der Nabe entfernt ist. | |||
# | # Stelle sicher, dass der Indikator (8) vollständig in die Gangwahlhülse eingeschraubt ist. Drehe maximal eine halbe Umdrehung zurück, um sie auf eine Linie mit der Führungshülse auszurichten. | ||
# | # Prüfe, dass sich die [[Schaltkette]] (5) frei über das Gangwahlführungsystem (6) bewegen lässt. | ||
# | # Stelle den fünften Gang mit dem Schalthebel ein und verbinde die Zugeinstellschraube (5) lose mit der Schaltkettenkupplung (4). | ||
# | # Wähle den zweiten Gang am Schalthebel und rotiere die Kurbeln, um sicherzustellen, dass der Gang gewechselt wurde. Drehe am der Zugeinstellschraube (2), bis die Mitte des erhabenen Sockels am Ende der [[Stößelstange]] (8) sich auf einer Ebene mit dem Ende der Achse befindet. | ||
# | # Schraube nun die [[Kontermutter]] (3) gegen die Einstellschraube (2) fest. | ||
# | # Wähle den fünften Gang, rotiere die Kurbeln und schalte nochmals in den zweiten Gang - prüfe die Einstellung. | ||
# | # Wenn die Einstellung sich nicht herstellen lässt, muss die Halterung des Zuganschlags in die korrekte Richtung verschoben werden und die Einstellarbeiten müssen noch einmal durchgeführt werden (Siehe Schritte 2,5 und 6 oben). | ||
# | |||
==Einstellen der Bremse - Sprinter Elite== | ==Einstellen der Bremse - Sprinter Elite== | ||
Version vom 29. Juli 2021, 09:56 Uhr
In diesem Artikel werden grundsätzliche Monateschritte und Waartungsarbeiten an der Sturmey-Archer Sprinter Fünf-Gang-Nabe erläutert. Für weitere Informationen zur Fehlersuche, gibt es einen separaten Artikkel: Fehlersuche bei der Sturmey-Archer Sprinter Fünf-Gang-Nabe.
Montage
Montage an der rechten Lenkerseite.
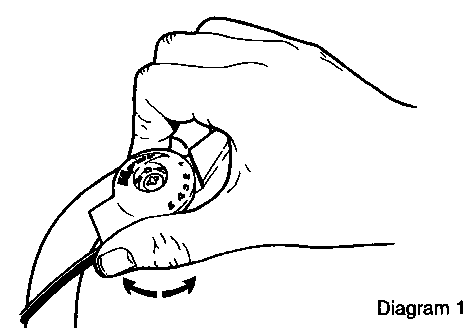
Die Orientierung des Hebels kann man auf individuelle Vorlieben einstellen, indem man die Plastikabdeckschraube in der Mitte des Trigger-Shifters abnimmt und die Kopfschraube löst. Drehe den Hebel an die gewünschte Position bevor Du die Schraube wieder festziehst und die Abdeckung wieder aufsetzt (Siehe Bild rechts).
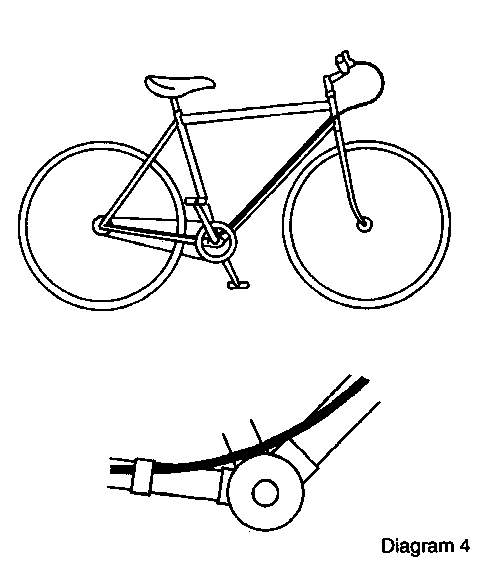
Wähle den fünften Gang. Befestige den Schaltzug am Unterrohr mit Kabelbindern oder Schellen. NBefestige den Schalzug nicht zu stark, damit die freie Beweglichkeit des Schaltzugs in der Hülle erhalten bleibt. Stelle sicher, dass sich der lenker frei bewegen kann (mindestens 400 mm Schlaufe ist dafür notwendig). Lass den Schaltzug oberhalb des Tretlagergehäuses verlaufen und befestige ihn auch an der Kettenstrebe.
Das Einstellen der Gangschaltung wird weiter unten erläutert.
Ersetzen der Züge
Den Zug demontieren
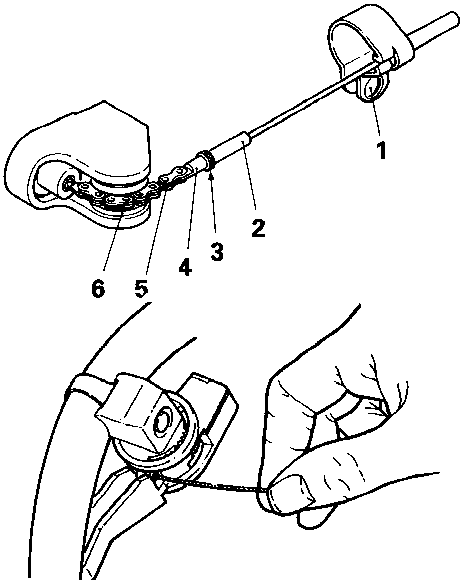
- Trenne den Zug an der Nabe, indem Du die Zugeinstellschraube (2) von der Schaltkettenkupplung (4) abschraubst (Siehe erstes Bild).
- Entferne den Zug vom Rahmen.
- Stelle den ersten Gang ein.
- Ziehe die komplette Abdeckung vom Trigger-Shifter, um den Schaltzug freizulegen.
- Drücke gegen den Schaltzug und hebe den Nippel aus dem Schlitz des Hebels
- Nimm den Schaltzug aus dem Hebel heraus.
Einen neuen Schaltzug montieren
- Stelle den ersten Gang ein
- Lege ein Stück Schaltzugdraht aus der Schaltzughülle frei
- Drücke den Schaltzugdraht durch den Schlitz im Hebel
- Lege den Nippel in den korrespondierenden Schlitz
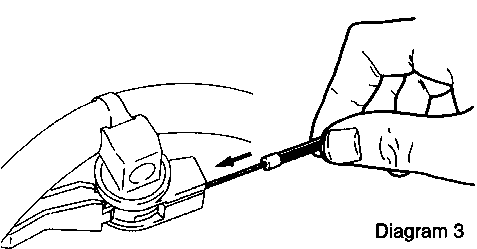
- Drücke nun die Schaltzughülle über den Schaltzugdraht zurück und schiebe sie in die Einbuchtung im Hebel (Siehe Diagram 3)
- Befestige den Schaltzug am Rahmen (Siehe Diagram 4)
- Verbinde nun den Schaltzug mit der Nabe, indem Du die Zugeinstellschraube (2) auf die Schaltkettenkupplung (4) schraubst
- Stelle die Gangschaltung ein.
Merke: Falls der Schalthebel beschädigt ist, wird empfohlen, die gesamte Einheit zu ersetzen.
Einstellen der Gangschaltung
Jedes Gangschaltungsysstem darf nicht außerhalb der Jusatge gefahren werden, um Schäden an Gangschaltungskomponenten und Schaltungsprobleme zu vermeiden.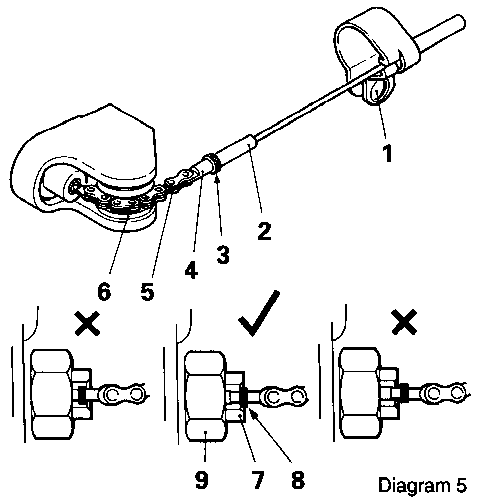
- Prüfe, dass die Halterung des Zuganschlags (1) (falls vorhanden) sicher und fest an der Kettenstrebe befestigt ist und mindestens 125 mm (5 Zoll) von der Nabe entfernt ist.
- Stelle sicher, dass der Indikator (8) vollständig in die Gangwahlhülse eingeschraubt ist. Drehe maximal eine halbe Umdrehung zurück, um sie auf eine Linie mit der Führungshülse auszurichten.
- Prüfe, dass sich die Schaltkette (5) frei über das Gangwahlführungsystem (6) bewegen lässt.
- Stelle den fünften Gang mit dem Schalthebel ein und verbinde die Zugeinstellschraube (5) lose mit der Schaltkettenkupplung (4).
- Wähle den zweiten Gang am Schalthebel und rotiere die Kurbeln, um sicherzustellen, dass der Gang gewechselt wurde. Drehe am der Zugeinstellschraube (2), bis die Mitte des erhabenen Sockels am Ende der Stößelstange (8) sich auf einer Ebene mit dem Ende der Achse befindet.
- Schraube nun die Kontermutter (3) gegen die Einstellschraube (2) fest.
- Wähle den fünften Gang, rotiere die Kurbeln und schalte nochmals in den zweiten Gang - prüfe die Einstellung.
- Wenn die Einstellung sich nicht herstellen lässt, muss die Halterung des Zuganschlags in die korrekte Richtung verschoben werden und die Einstellarbeiten müssen noch einmal durchgeführt werden (Siehe Schritte 2,5 und 6 oben).
Einstellen der Bremse - Sprinter Elite
sprint6If the wheel will not rotate freely, or cannot be locked by a full application of the lever then adjustment is necessary. (See diagram 6)
- Loosen the brake adjuster locknut.
- Turn the adjuster (2) until the brake is applied.
- Loosen the adjuster until the wheel just spins freely.
- Tighten the locknut. Note: During the first few miles brake linings "bed-in" and may require adjustment.
Montage des Laufrads
The Sturmey-Archer SPRINTER Hub can be fitted into rear chainstay widths between 120 mm - 126 mm using the appropriate spacers.Note: These products are not designed for bicycles with vertical rear dropouts as chain tensioning cannot be achieved. (But on the other hand, see this -- John Allen) If the wheel is removed, these instructions should be followed during re-assembly:-
SPRINTER ELITE
- With the chain on the sprocket place the hub axle into the chainstay ends.
- Fit washers and axle nuts. Ensure that the serrations on the anti-rotation lockwashers face into the frame with the lugs located into the chainstay slots. Note: Ensure the correct size anti-rotation washer (to match the chainstay slot width 9.5 mm or 7.9 mm) is fitted. DO NOT tighten the axle nuts at this stage or misalignment of the brake plate may occur.
- Insert brake arm on hub loosely into the clip. With the wheel centralised, chain tensioned and aligned correctly, tighten the axle nuts to a torque of 25NM .
- Tighten the brake arm clip nut firmly to 7NM. Max. Ensuring brake arm remains in line.
- Control Cable - Ensure the indicator (8) is screwed firmly into the axle. Unscrew the indicator by up to half a turn if necessary to ensure easy fitment over the selector guide and connection to the gear cable. Connect the indicator coupling (14) to the gear cable adjuster (12).
- Brake Cable Installation - Pinch Bolt specification:
- Locate the brake adjusting spigot into the slot on the brake arm.
- Set the adjuster so that there is approximately 5 mm. of thread showing above the locknut.
- Holding the brake lever on the brake plate in the 'on' position, pull the inner cable taut, fit the pinch bolt and tighten the pinch bolt screw.
- Cable Installation - Closed End Cables : Locate the brake adjusting spigot in the slot in the brake arm.
- Fit cable nipple into position on the brake lever assembly ensuring that the recess mates with the larger diameter nipple. Note: To maintain maximum braking efficiency avoid sharp bends and kinks in the cable.
- Replace chainguard/gear case (if fitted). Note: Before use check and make necessary adjustments to brakes (See Section 4) and re-adjust gears (See Section 3).
SPRINTER Nabe
Replace Instruction 2 above by: Fit washers and axle nuts. With the wheel centralised, chain tensioned and aligned correctly, tighten the axle nuts to a torque of 25NM.
Instructions 3, 4 and 7 are not applicable.
Wartung
sprint8sprint7 When service problems arise, they usually occur outside the hub, and the checks listed previously must be made before removing the wheel from the bicycle.
When service problems occur which cannot be corrected by attention to external maintenance, a close inspection of the working parts inside the hub will be necessary. Refer to the fault diagnosis chart before commencing disassembly which can be done without the use of special tools. Note: The right hand end of the axle is where the sprocket and indicator are fitted. The axle should be clamped across the flats taking care not to damage the threads.
Demontage
- Remove the indicator rod, indicator protectors or gear selector guide (if fitted), axle nuts and spacing washers from both ends of the axle.
- Use a screwdriver to release the sprocket circlip from the driver, then remove the spacing washer, sprocket, and outer dustcap (Note the order of these parts).
- sprint10sprint9Unscrew left hand cone locknut (Remove cone adjuster and brake assembly ELITE). Note position of any washers fitted.
- Unscrew the right hand ball ring with a 'C' spanner or hammer and suitable punch, and unscrew the ball ring to release the internal assembly from the hub shell (See diagram 7).
- Clamp the left hand end of the axle in a vise and remove the right hand cone locknut, lockwasher, cone, clutch spring cap and clutch spring (See diagram 8).
- Remove driver assembly, ball cup and gear ring assembly (See diagram 9).
- Remove clutch from axle and remove washer from inside clutch.
- Remove spring and clutch sleeve.
- Remove pinion pins and planet pinions.
- Remove axle and planet cage from vise and clamp right hand end of axle.
- Using circlip pliers remove circlip and discard. Remove planet cage, planet cage spring, sun pinion cap, secondary sun pinion and primary sun pinion. (See diagrams 10 & 11).
- To remove gear selector key compress indicator spring towards vice using suitable screwdriver. Remove axle key assembly.
- Release pressure on spring, and thoroughly clean all the internal parts and replace those worn or damaged. Specific items to be checked are:
- 1. Axle - straightness, condition of thread and slots.
- Condition of all pawls, springs, balls, ball tracks, pinions and gear ring teeth and drive slots.
- Check free movement of driver actuator and pawl action by inserting clutch and turn (See diagram 12). Note: it is recommended that this assembly is not dismantled but if necessary replace with a new assembly.
- Gear selector key - Check threads for wear and free movement in axle slot.
- sprint12sprint11Clutch - squareness of drive corners.
Zusammenbau
- Clamp the drilled end of axle horizontally in vise with slot uppermost (See diagram 13).
- Using a small screwdriver compress indicator spring towards vise and insert gear selector key assembly.
- Release indicator spring and remove from vice.
- Test by screwing indicator into axle finger tight and test movement of gear selector key by pulling on the indicator.
- PINION Installation
- Reclamp axle in vise in the vertical position, circlip slot uppermost
- Fit primary sun pinion such that it engages with the gear selector key, recess uppermost.
- Fit secondary sun pinion, bore protrusion downwards locating into primary sun pinion (See Diagram 11).
- sprint14sprint13Fit cap over gear selector key domed side uppermost.
- Fit planet cage spring and planet cage ensuring pawl end uppermost.
- Take new circlip and locate it in the circlip groove, ensuring that circlip sharp corners are uppermost. Note: TAKE CARE NOT TO OVERSTRESS CIRCLIP
- Clutch Installation
- Remove axle from vice. Reclamp left hand end of the axle in vice (See diagram 14)
- Lubricate pinion pins with grease.
- Fit planet/pinions and pins with their timing marks pointing radially outwards Note: SEE DIAGRAM 15. FOR PINION TIMING, EACH PINION HAS A TIMING MARK STAMPED ON ONE OF THE LARGE DIAMETER PINION TEETH.
- Fit clutch sleeve and clutch sleeve spring.
- Fit clutch ensuring it meshes with the top of the pinion pins.
- Fit washer into clutch (See diagram 9).
- Gear ring Pawl, Ball Ring, Driver Assembly
- Take gear ring and fit the pawls pawl pins and springs if required as indicated (See diagram 16).
- Lubricate pinions and gear ring teeth with grease.
- sprint15Locate the gear ring assembly over the planet cage, then fit ball ring.
- Lubricate the right hand ball cage assembly with grease.
- Place the ball cage assembly on the ball ring ensuring that the balls are positioned downwards.
- Rotate the actuator anti-clockwise to compress pawls (See diagram 12)
- With actuator in this position fit driver assembly, rotating ant-clockwise to ensure that driver engages with the clutch splines.
- Right-hand Cone Adjustment
- Slide on the clutch spring and then the cap (with its flat face uppermost) over the axle and locate on the spring.
- Screw down the right hand cone finger tight - Loosen the cone off by half a turn and lock it in position with the lockwasher and locknut. Note: UNDER NO CIRCUMSTANCES MUST THE CONE BE UNSCREWED MORE THAN 5/8 OF A TURN, AS THIS COULD ADVERSELY AFFECT GEAR Adjustment.
- Internal Assembly Installation
- Remove the assembly from the vice. Apply grease to the working parts.
- sprint16Insert the assembly in the hub shell and tighten the ball ring, turning anti clockwise first to prevent cross threading. Tighten clockwise using 'C' spanner (or suitable punch) to torque of 50Nm.
- Sprinter Left-hand Cone Adjustment
- Fit the left hand cone, spacing washer(s) and locknut.
- Adjust the left hand cone until minimum movement is felt at the wheel rim, ensuring free running of hub. Then tighten locknut.
- Sprinter Elite Brake Assemblies Installation and Left-hand Cone Adjustment Adjustment
- Install left hand cone.
- Clean brake drum using a cloth ensuring all dirt/grease is removed.
- Make sure brake linings are clean. (Brake shoes should be replaced if contaminated with grease).
- Fit brake assembly into brake drum. Fit cone adjuster over cone, fit washers and locknut.
- Adjust left hand cone until minimum play is felt at the wheel rim ensuring hub runs free. Apply brake ensuring brake shoes are centralised. Tighten locknut.
- Sprocket Installation
- Assemble the dustcap, spacer washer, sprocket and circlip to obtain the desired chainline.
- Assemble the wheel into the bicycle (See Section 5).
- Reconnect cables and adjust gear/brake as previously described and test fully before using the cycle. (See Sections 2, 3 & 4).
Quelle
Dieser Artikel basiert auf dem Artikel The Sturmey-Archer Sprinter 5-Speed Bicycle Hub von der Website Sheldon Browns. Originalautor des Artikels ist Jane Thomas mit Überarbeitungen durch Sheldon Brown.
- S3X
- Die Sturmey-Archer ASC Fixed Gear Drei-Gang-Nabe
- Sturmey-Archer Naben
- Fehlersuche bei der Sturmey-Archer Sprinter Fünf-Gang-Nabe
- Sturmey-Archer SW Drei-Gang-Naben
- Die Sturmey-Archer ASC Fixed Gear Drei-Gang-Nabe/Wartung der Sturmey-Archer ASC Fixed Gear Drei-Gang-Nabe
- Quadrant Shifter
- Dynohub
- SunRace
